

English below. Choose other language here: German, French, Italian, Spanish, Swedish, Dutch, Czech, Portuguese, Danish, Finnish, Norwegian
Carpe Iter Pad v4 Manual
Version: 2.8 (November 7, 2022)
Applicable models: v4, v4b, v4c, v4d (“Device” or “CI Pad”)
Table of Contents
- 1. General description
- 2. Accessories
- 3. Before first use
- 4. Controlling elements, ports
- 5. Use – Android general tips
- 6. Use – Carpe Iter specifics
- 7. Charging / Battery Indicator
- 8. Operating conditions / instructions
- 9. Carpe Iter Holder
- 10. Power source
- 11. Troubleshooting
- 12. Disclaimer
- 13. Manufacturer’s Warranty
1. General Description
1.1. The Device is an Android-powered smart device capable of running most applications designed for the respective Android generation.
1.2. Please refer to the technical specifications of your specific model for a detailed description of the Device’s features and abilities.
2. Accessories
2.1. Standard accessories for CI Pad:
- 2.1.1. Cloth pouch with shoulder strap.
- 2.1.2. USB-A to USB-C adapter.
- 2.1.3. SIM card adapter.
- 2.1.4. Wall USB charger (EU socket).
- 2.1.5. M8 charging cable with dust cap for the M8 charging connector. The M8 charging cable mates with our proprietary 12V power source for vehicles with a 12VDC electrical system. One power source is included with the Carpe Iter Holder and is also sold separately.
- 2.1.6. Dust cap for the M8 charging connector.
2.2. Carpe Iter Holder (“Holder”): Designed for motor vehicles, especially motorcycles. The Holder is sold in two versions: charging (includes a proprietary power source for the Device and pogo pin charging connector) and non-charging. If using the non-charging version of the Holder, the CI Pad can be charged via the M8 charging cable from our proprietary power source (included with the special CI Pad non-charging Holder set or purchased separately). References to "charging via the Holder" refer to the charging version.
2.3. Brackets to retain the M8 charging cable are included with every Holder. Refer to the addendum of this manual for installation instructions.
2.4. The pogo pin charging version of the Holder may require installation of that connector by the user. Refer to the addendum of this manual for installation instructions.
3. Before First Use
3.1. Before first use, charge the Device to at least 50% battery capacity with the provided USB wall charger.
3.2. Connect the Device to the internet.
3.3. Open the pre-installed Carpe Manager app and install or update at least the following:
- 3.3.1. Manager app
- 3.3.2. Controller app
- 3.3.3. GPSTune app (if available for your model)
4. Controlling Elements & Ports
4.1. The Device contains a capacitive multi-touch enabled screen and hardware control buttons.
4.2. Hardware elements and port layout:
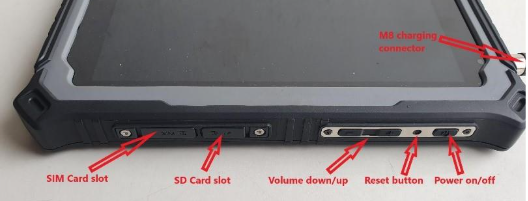
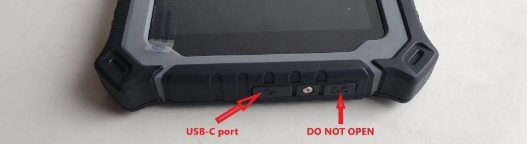
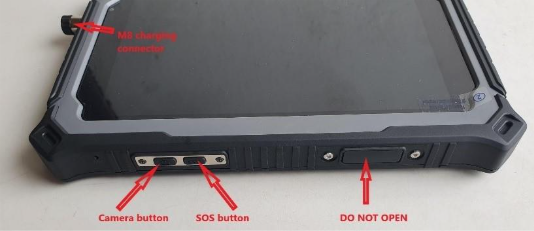
4.3. The USB-C port features OTG (on-the-go) functionality and can be used to charge the Device with the provided USB wall charger and to transfer data to or from a compatible computer.
WARNING: Do NOT use third-party quick chargers on the USB-C port under any circumstances.
4.4. Access to the USB port, SIM/SD card slots, and audio jack is protected by rubber flaps. These flaps must be completely closed to maintain water and dust resistance. Closing the flaps incorrectly will damage them when inserting the Device into the Carpe Iter Holder. Do not use sharp objects to open the flaps—this will damage the embedded seal, compromise water resistance, and allow dust and debris to enter the Device, which voids the warranty.
4.5. Proper flap closure sequence:
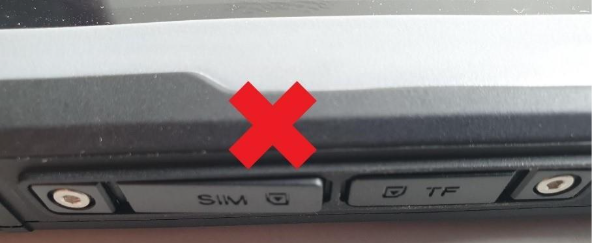
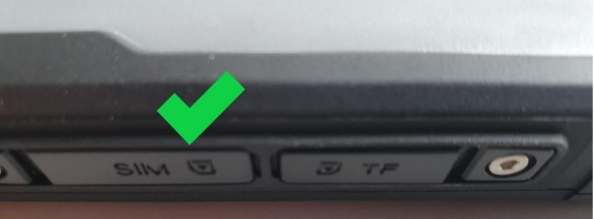
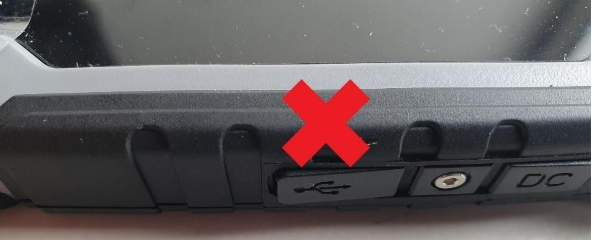
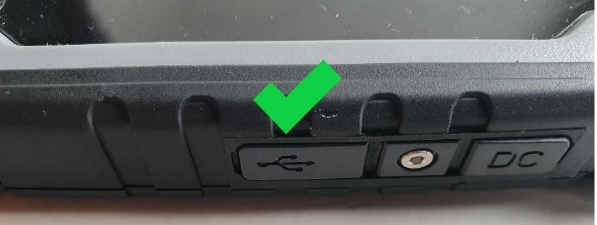
4.6. When closed properly, the port flaps will be completely flush with the Device’s body. Moderate force may be required to push them into the correct seated position.
4.7. Do not use sharp objects to open the port flaps to avoid damaging the rubber seals.
4.8. Correct SIM and SD card orientation:
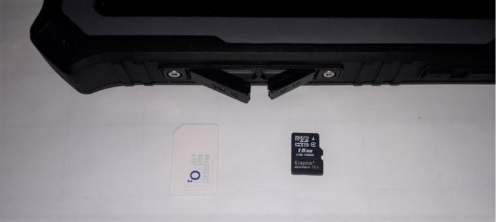
4.9. The SIM and SD card must lock into position—push them fully into the slot until you hear an audible click. Do not use sharp objects to push the cards in.
4.10. When the M8 charging cable is not in use, always screw the M8 connector cap back on firmly. Failure to do so compromises water resistance. Replacement caps are available as spare parts.
5. Use – Android General Tips
5.1. The Device is powered by the Android operating system and functions similarly to standard Android smartphones.
5.2. For general Android operating instructions, refer to the official Google support portal: https://support.google.com/android/?hl=en#topic=7313011
5.3. Google Play & Services:
- 5.3.1. Recommendation: Enable GPS and allow the Device to achieve a 3D position lock before signing into your Google account. This ensures Google registers the correct regional app versions.
- 5.3.2. The Device is pre-certified with Google. To access Google Services and the Play Store, log in with your Google account.
- 5.3.3. Google system apps may need to update before Google Play Store becomes fully operational. To check for updates manually, open Google Play Store before logging in, tap the overflow menu (three dots in the top-right corner), and select Check for updates.
- 5.3.4. You may use the same Google account on your CI Pad as on your primary smartphone to access previously purchased compatible apps.
- 5.3.5. Previously purchased apps may take time to appear under your account library. In rare cases, you may need to clear the cache for both Google Play Services and Google Play Store, update Google apps manually, and re-login.
6. Use – Carpe Iter Specifics
6.1. The CI Pad v4 automatically boots when connected to an active power source (USB wall charger, Holder, or M8 charging cable). This auto-start feature cannot be disabled.
6.2. The Device comes pre-installed with the Carpe Manager app:
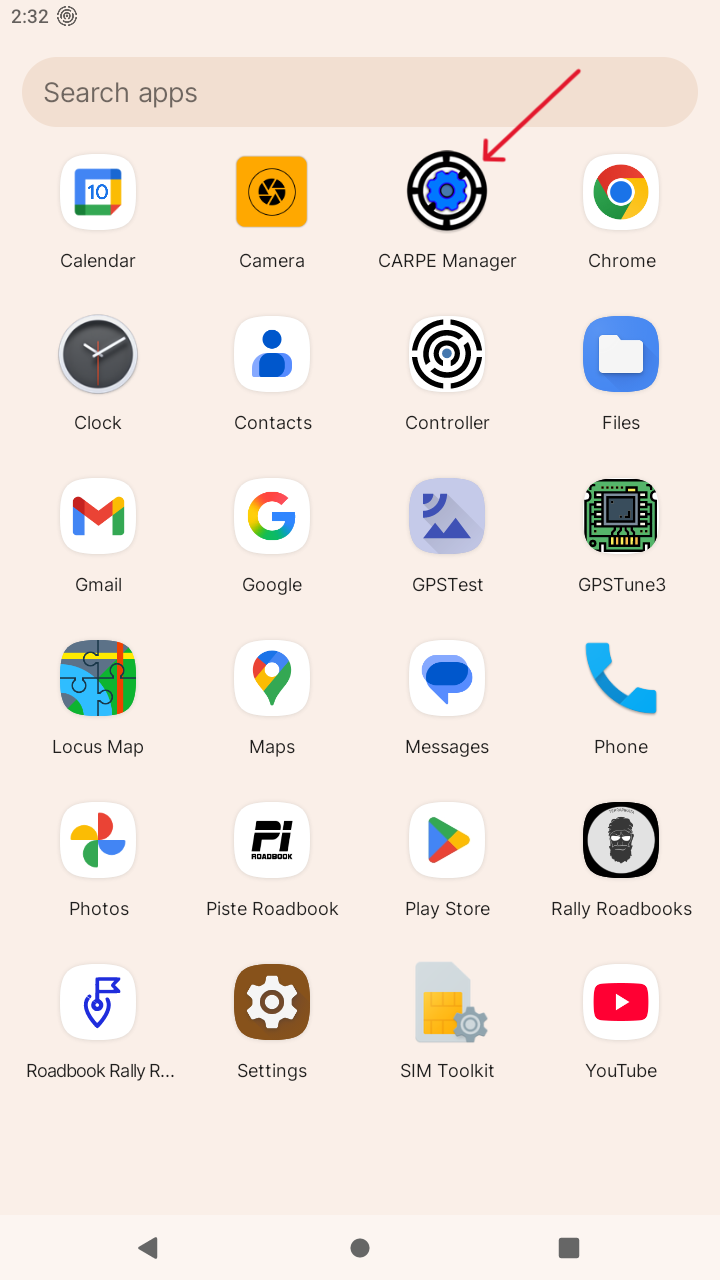
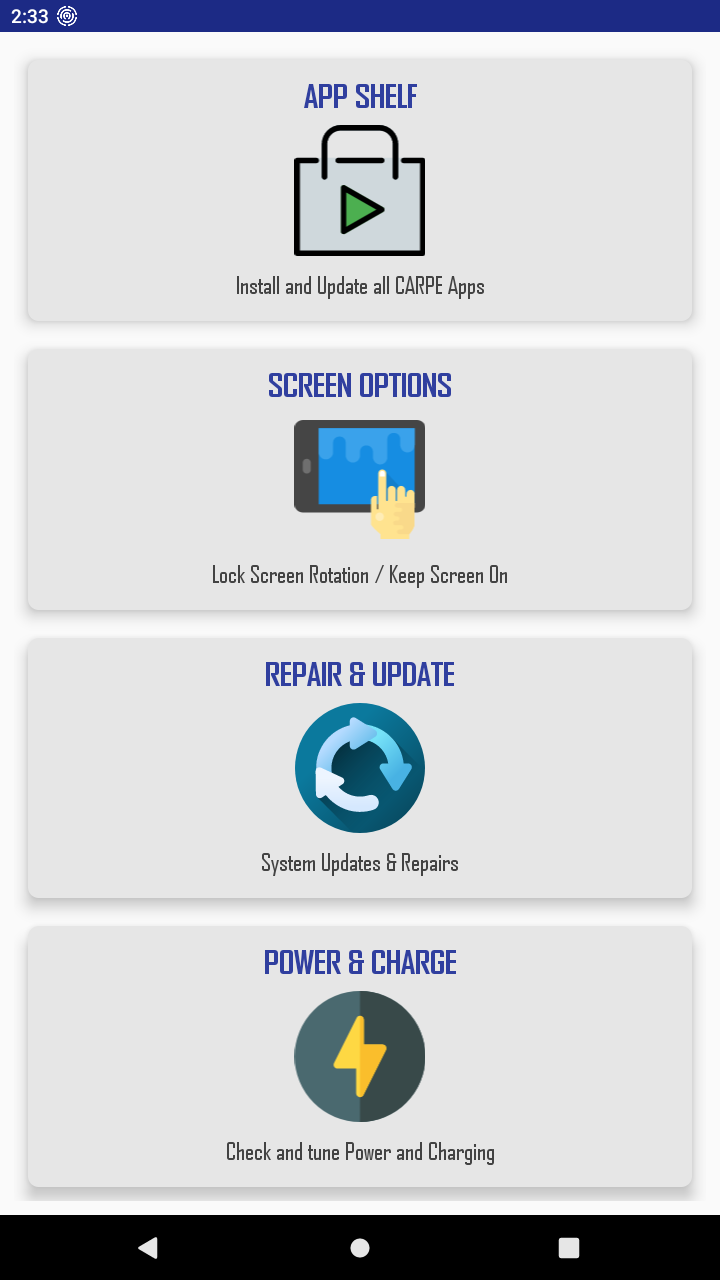
6.3. The Manager app manages firmware downloads, system settings, and Carpe Iter software utilities.
6.4. Regularly check the Manager app for system and application updates, which provide feature enhancements and stability fixes.
6.5. The GPSTune app must remain installed and running in the background to provide optimal GNSS location services (on v4b/v4c/v4d models, these services are integrated directly into the Carpe Manager app).
7. Charging / Battery Indicator
7.1. The Device can be charged via three methods: USB-C port, rear contact charging pads (via Holder), or the M8 screw-on connector.
7.2. The Device automatically boots when charging power is detected, provided the battery contains sufficient minimum operational charge.
WARNING: Use only the provided USB wall charger or the proprietary Carpe Iter 12V power supply. NEVER use third-party quick chargers, as high-voltage fast charging protocols can destroy the USB and internal charging circuitry.
7.4. When charging on a vehicle, you must use either the charging version of the Carpe Iter Holder or the M8 charging cable connected to the proprietary Carpe Iter power supply. Using any non-approved power source or modifying factory wiring will void the warranty.
7.5. The power source included with the charging Holder supports charging via the Holder pins, the M8 charging cable, or both simultaneously.
CRITICAL SAFETY WARNING:
- NEVER charge the Device via USB and the M8 connector simultaneously.
- NEVER charge the Device via USB and the Holder simultaneously.
- NEVER connect the M8 charging connector to a separate second power source when the Device is docked in an active charging Holder. Both inputs must run from the exact same Carpe Iter power source if used together.
7.7. The USB-C port must never be used while riding a motorcycle or vehicle in motion. Road vibration will damage the physical USB connector, and opening the protective flap exposes the Device to liquid and dust ingress.
7.8. Ensure the M8 cable and Holder are never connected to two different electrical sources at once.
7.9. Device charging current is limited to approximately 2A. If total system power consumption exceeds 2A (such as full screen brightness combined with multiple background tracking apps), battery percentage may slowly decrease while in use. Reducing screen brightness significantly decreases power draw.
7.10. Charging capacity is fully sufficient for standard navigation tasks (100% brightness, GPS enabled, and one active navigation app recording tracks).
7.11. Intelligent Battery Protection: The Carpe Manager app automatically cycles the battery charge between 60% and 80% when connected to vehicle power to prevent thermal stress and extend battery longevity:
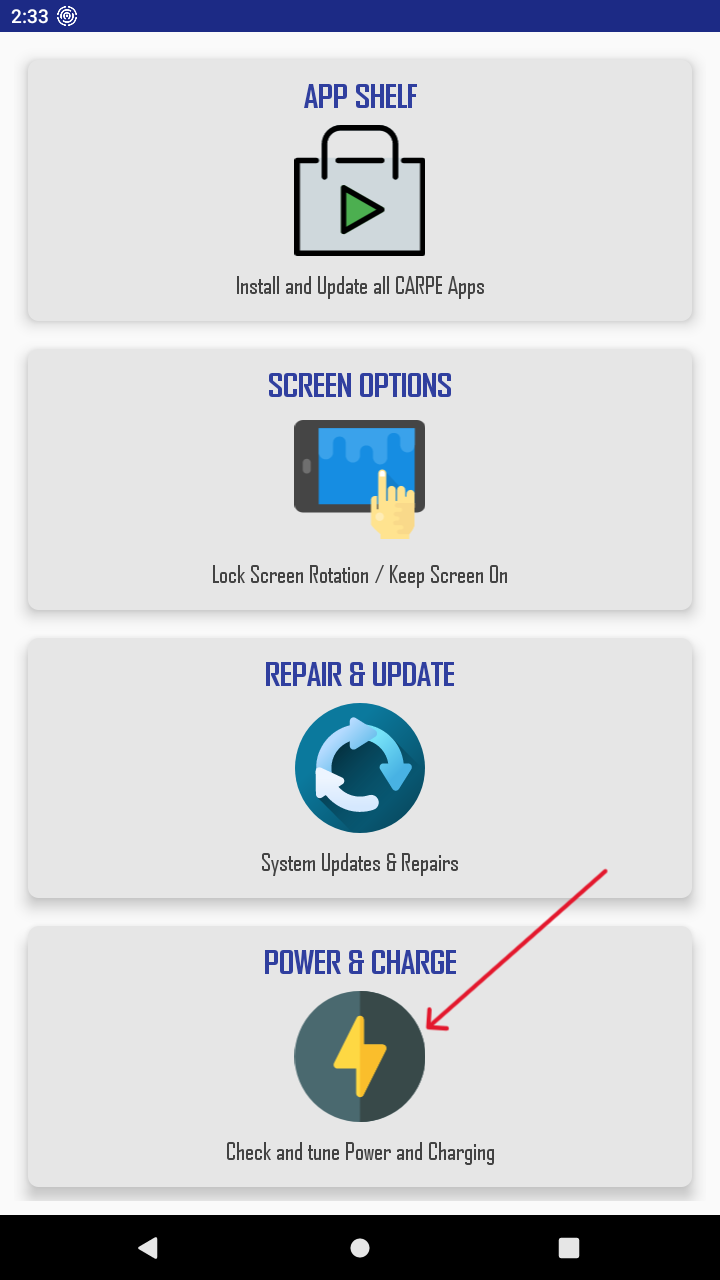
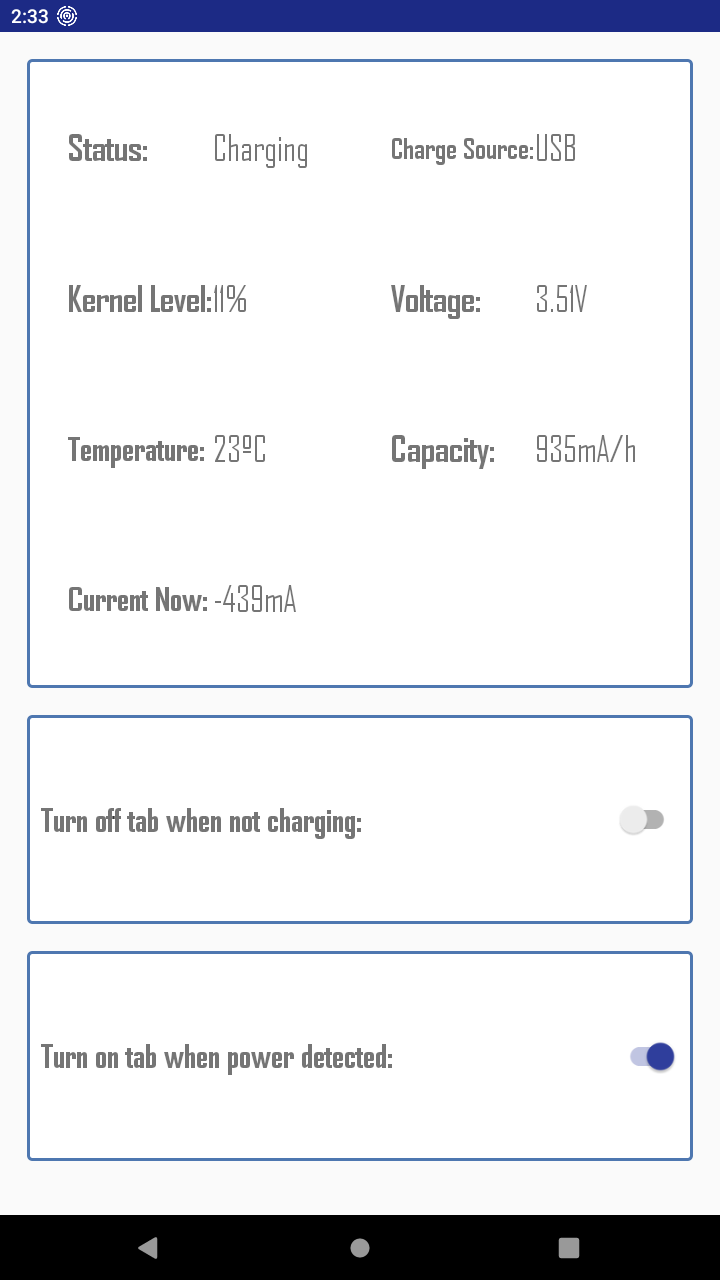
7.12. Intelligent power management can be toggled off in the Carpe Manager app to allow charging to 100%. However, keeping the battery at 100% continuously under high ambient heat is not recommended as it degrades battery cells.
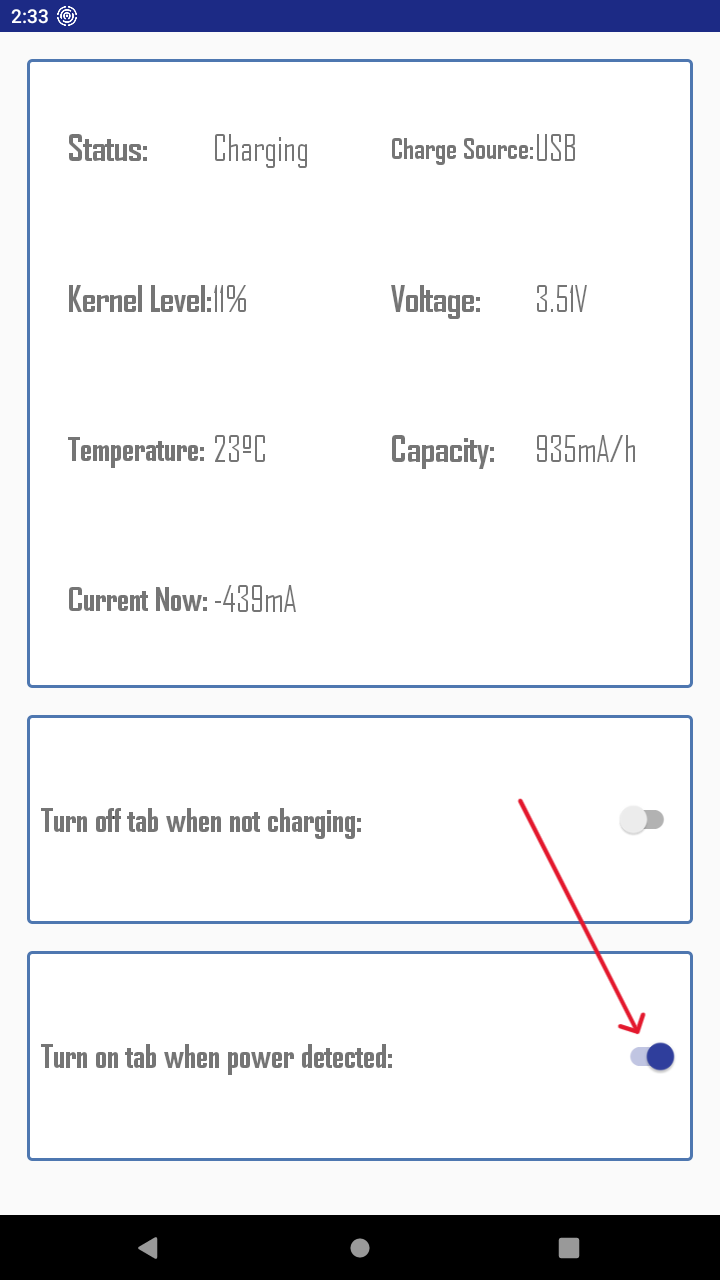
7.13. The system battery percentage indicator is an approximation based on algorithmic models. Actual battery voltage is the absolute operational metric (the Device will operate until battery voltage drops to 3.5V, regardless of whether the percentage reads 1%).
7.14. The Carpe Manager app periodically recalibrates the battery indicator. During calibration cycles, the percentage readout may fluctuate temporarily.
7.15. Real-time battery voltage can be monitored inside Carpe Manager → Power&Charge or via the Android quick settings pull-down menu:
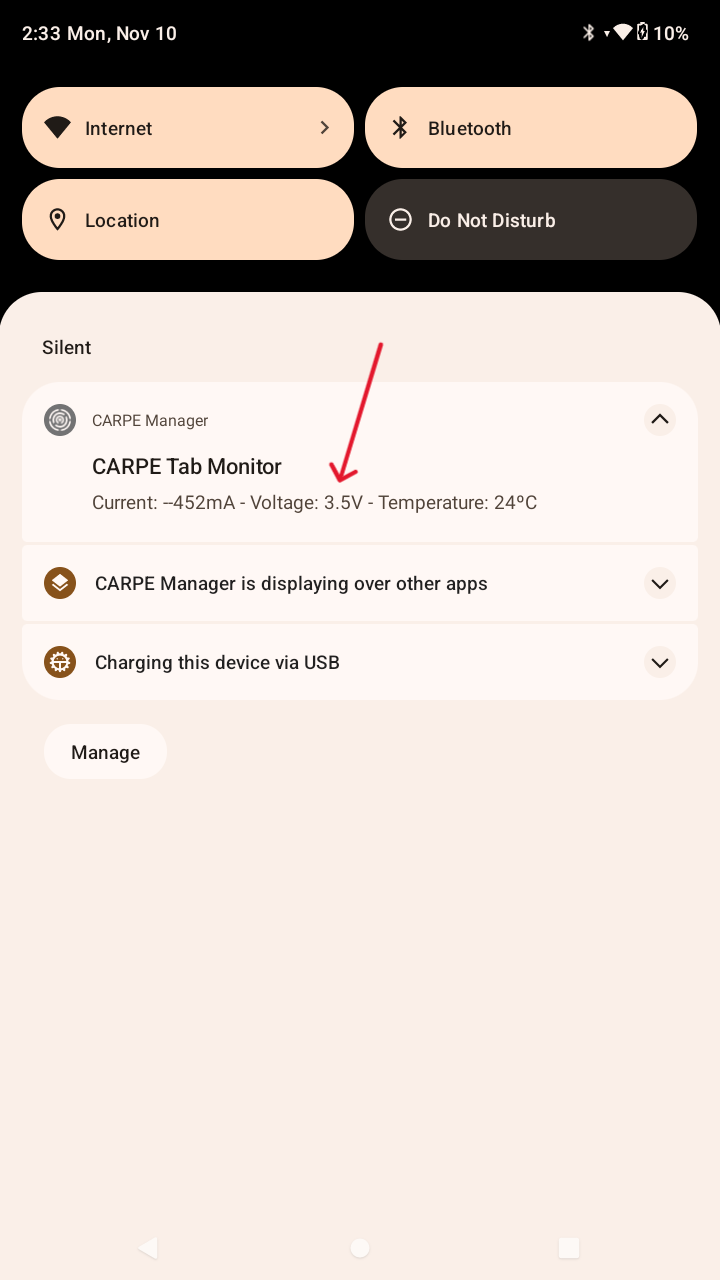
7.16. The battery percentage display is non-linear relative to battery voltage; this is normal operating behavior.
7.17. Nominal fully charged battery voltage is ~4.2V. Fully depleted cutoff voltage is 3.5V. When the battery reaches 3.5V, the Device shuts down automatically to prevent cell damage.
8. Operating Conditions & Instructions
8.1. The Device is not designed to remain on the vehicle permanently. When not riding, remove the Device and store it in a clean environment between 0°C and 35°C.
8.2. Operational ambient temperature range is 0°C to 40°C. An automated thermal protection system will prevent boot-up or trigger a safety shutdown if temperature thresholds are exceeded.
8.3. Operating at high brightness while charging generates internal heat. In hot weather, reduce screen brightness and ensure airflow across the Device.
8.4. Sub-zero Operation: Do not start the Device if it has cold-soaked below 0°C. Warm the unit prior to booting. Never operate the Device in ambient temperatures below -5°C.
8.5. Protect the unit from external heat sources (e.g., proximity to engine radiators or exhaust headers).
8.6. Avoid leaving the Device stationary under direct sunlight for extended periods.
8.7. Long-term solar UV exposure may cause minor cosmetic LCD discoloration; this does not affect functionality.
8.8. Wet Weather Riding: Mount the Device behind a windscreen or fairing mask. At high road speeds, direct wind-driven rain exerts pressure exceeding the IP water rating.
8.9. Vehicle Battery Charging: Always unclip the Device from the Holder and disconnect the M8 cable before attaching an external battery charger or tender to your vehicle. Maintenance charger pulses can confuse the Holder's auto-switch circuitry and trigger rapid power cycling.
8.10. Storage & Deep Discharge Prevention: Power the Device completely off during storage. If the battery is depleted, recharge it to at least 50% capacity immediately to prevent permanent cell degradation.
8.11. Long-term Storage: For storage exceeding 1 week, charge the battery to 60% before powering down.
8.12. Keep the rear charging pads clean and protected from conductive materials, metal shavings, or liquids when unmounted to prevent electrical short circuits.
9. Carpe Iter Holder
9.1. The Holder is custom-engineered specifically for the CI Pad. Do not attempt to dock other devices.
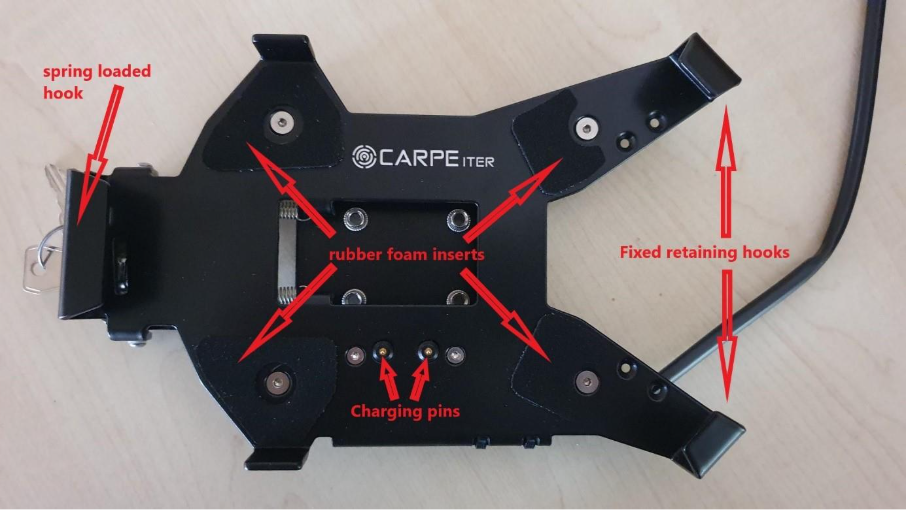
9.2. The charging Holder provides mechanical retention and high-reliability pogo pin charging contacts.
9.3. Do not attempt to use the proprietary power supply for any non-Carpe Iter equipment.
9.4. Holder Overview:
9.5. Installation requires basic mechanical and electrical competence. If uncertain, seek installation by a qualified motorcycle workshop.
9.6. Protect the pogo pins from impact. Insert the tablet gently to avoid bending or shearing the pin heads.
9.7. Prevent conductive debris from bridging across the exposed pogo pins.
9.8. Mounting the Holder
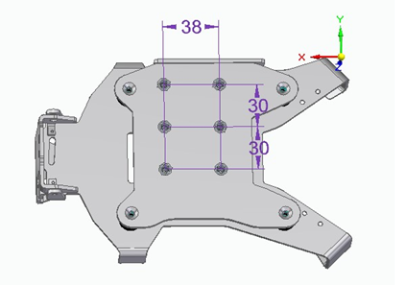
9.8.1. The Holder base plate features 6 threaded nuts for M5 screws (screws not included).
9.8.2. The mounting pattern conforms to the industry-standard AMPS pattern (30x38 mm) in landscape orientation:
9.8.3. With optional Carpe Iter mounting brackets, the Holder can be mounted in horizontal or vertical orientations.
9.8.4. The Holder must be secured using at least 4 screws arranged in a rectangular pattern for stability.
9.8.5. Mount the bracket as close to the Holder's centerline as possible.
9.8.6. Total combined weight of the Holder and Device is approximately 1.0 kg.
9.8.7. Mount the assembly only to rigid structural elements (handlebar clamps, solid crossbars, or reinforced rally nav towers).
9.8.8. Isolate the Holder from severe single-cylinder engine vibration. Extreme harmonic vibration can cause fretting wear on the charging pins.
9.8.9. Mounting Guidelines:
- 9.8.9.1. Ball mounts (e.g., RAM mounts) are not recommended for heavy off-road use. If required, use a minimum 1.5-inch C-size ball.
- 9.8.9.2. Factory OEM GPS crossbars (e.g., Yamaha Tenere 700) often require aftermarket reinforcement braces to carry 1 kg reliably.
- 9.8.9.3. Flexible aftermarket rally towers can amplify vibration. Add rubber isolation dampening if resonance occurs.
- 9.8.9.5. Generic smartphone brackets are structurally inadequate for the CI Pad.
9.9. Docking the Device into the Holder
9.9.1. Proper Orientation: The Device must be inserted with the M8 charging connector facing away from the spring-loaded retaining hook:
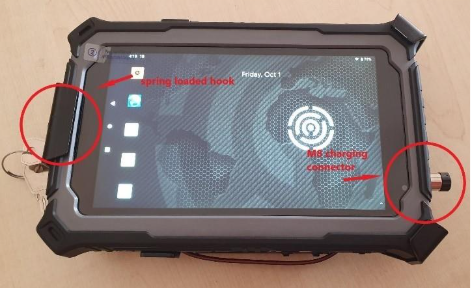
9.9.2. Never insert the tablet backwards or inverted; doing so will crush the side buttons and misalign charging contacts.
9.9.3. Step-by-Step Insertion:
- 9.9.3.1. Verify all port flaps are closed flush (see Sections 4.5 & 4.6).
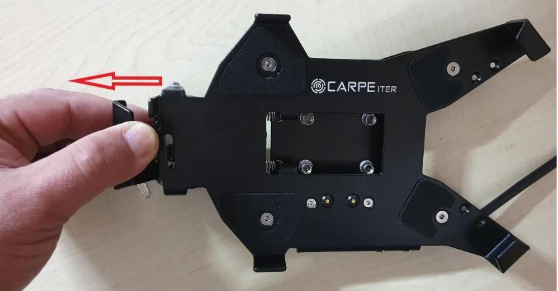
- 9.9.3.2. Pull open the spring-loaded retaining hook with one hand. Angle the tablet base into the fixed lower retaining hooks:
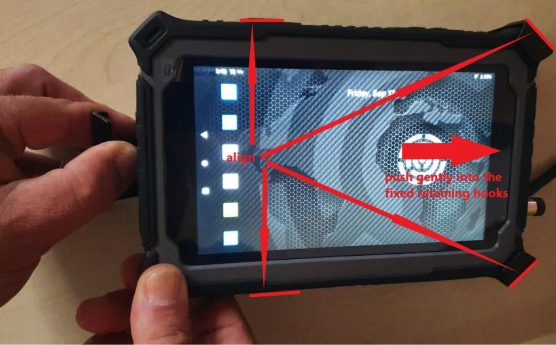
- 9.9.3.3. Align the tablet edges with the side guide rails.
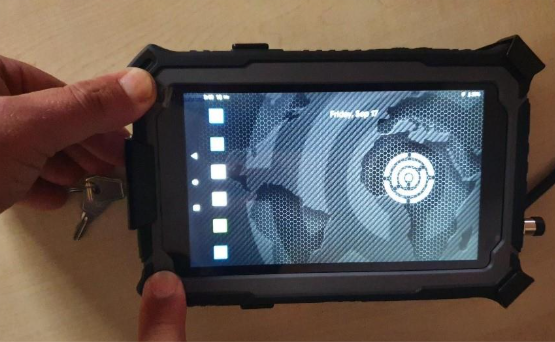
- 9.9.3.4. Press the tablet flat against the backplate and release the spring hook:
- 9.9.3.5. Minimal force is needed when properly aligned. If resistance is felt, re-verify flap seating and check for bracket distortion.
- 9.9.3.6. The keyed lock is optional; the spring latch provides full retention during riding without the key engaged.
9.9.4. When seated, the tablet will fit snug without free play. Do not forcefully pry the tablet to test fitment. If play develops over time, replace the adhesive rubber foam buffer strips.
9.10. Holder Maintenance
- 9.10.1. Periodically inspect and tighten all bracket and mount fasteners.
- 9.10.2. Check the aluminum cradle for bending after any crash or drop.
- 9.10.3. Clean the pogo pins regularly with electrical contact cleaner to remove road grime and oxidation.
- 9.10.4. Pins are factory-lubricated; initial lubrication is not required.
- 9.10.5. Re-lubricate clean pins with dielectric contact grease or silicone oil. Ensure lubricants are silicone-safe to prevent seal degradation.
- 9.10.6. Compress each pin while applying non-conductive dielectric grease to distribute lubricant inside the barrel. Do not use electrically conductive grease.
- 9.10.7. Rubber pads, foam inserts, and wiring pigtails are consumables and can be replaced using official spare parts.
10. Power Source
10.1.1. The CI Pad must never be exposed to voltages exceeding 5.5V DC. The device must only be powered via the supplied AC charger or the official 12V-to-5V Carpe Iter power supply.
10.1.2. The power supply features 1 set of 12V input leads and 2 regulated 5V output connectors (one for Holder pogo pins, one for M8 cable):
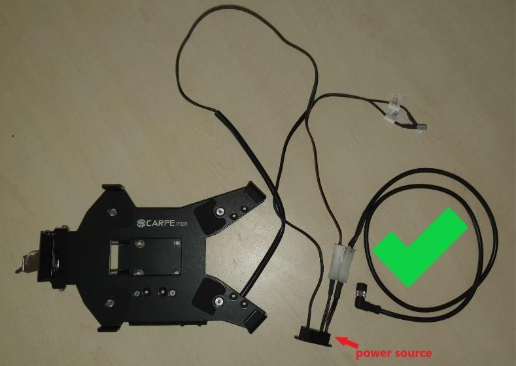
10.1.3. Both outputs originate from a single regulation circuit. Do not connect the M8 cable to an external second power converter while docked in the Holder.
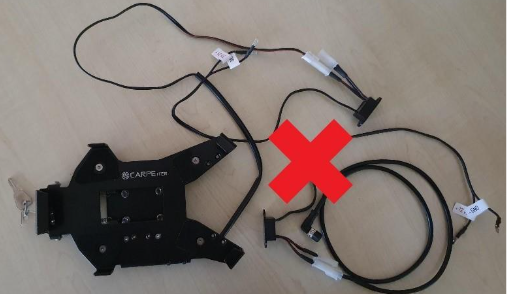
10.1.4. Smart Switching Threshold: The standard power supply activates when input voltage exceeds 13.1V – 13.6V DC (indicating the engine is running and alternator is charging). If your motorcycle cannot maintain 13.1V+, a non-switching power supply (operating down to 10V) is available separately.
10.1.5. The power supply automatically turns off when input voltage drops below 12.9V DC to protect the starter battery from discharge.
10.1.6. When switching voltage is detected, the unit activates within 30 seconds (soft-start) and displays a solid green LED indicator.
10.1.7. Connecting the power supply to an ignition-switched auxiliary circuit is recommended over direct unswitched battery connection.
10.1.8. If wired directly to the battery, external trickle chargers may trigger the auto-switch circuit during storage. Disconnect the power supply during seasonal vehicle charging.
10.1.9. Disconnect the CI Pad before connecting high-output battery chargers to the motorcycle.
10.1.10. LiFePO4 Battery Note: Lithium motorcycle batteries maintain resting voltages above 13.1V. A smart power supply wired directly to a lithium battery will remain powered continuously; always use a switched circuit for lithium installations.
10.1.11. Ensure the host vehicle electrical system can supply at least 15W continuous power (approx. 1A @ 14V).
10.1.12. The optional non-switching power supply operates down to 10V but contains no low-voltage cutoff protection.
10.1.13. Maximum input rating is 20V DC. Input surges exceeding 20V will permanently destroy the converter.
10.1.14. The input leads are fitted with 6.3mm Faston terminals. If wiring directly to battery terminals, install an inline 5A fuse on the positive lead.
10.1.15. An optional fused battery extension harness with M6 ring terminals is available:
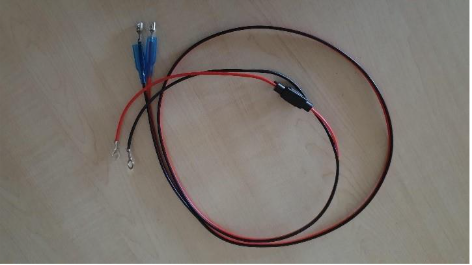
10.1.16. Do not cut or replace factory output connectors. Tampering with output wiring voids the warranty.
10.1.17. Place wiring connectors behind fairings. If exposed, seal connections with vulcanizing electrical tape.
10.1.18. Apply dielectric grease to all electrical quick-disconnect terminals.
10.1.19. Power supply operating ambient limit is 60°C. Output current derating occurs above 50°C. Mount away from cylinder heads and exhaust pipes.
11. Troubleshooting
11.1. Software Issues
- 11.1.1. If the system freezes or apps crash, perform a soft reset by pressing the hardware Reset button.
- 11.1.2. If issues persist, perform a Factory Data Reset via Android settings (wipes all user data), or submit a support ticket at https://support.carpe-iter.com/en/support/tickets/new.
- 11.1.3. For bugs within third-party apps, contact the respective developer via the Google Play Store listing.
- 11.1.4. For Carpe Iter proprietary software issues, submit diagnostic logs via a support ticket:
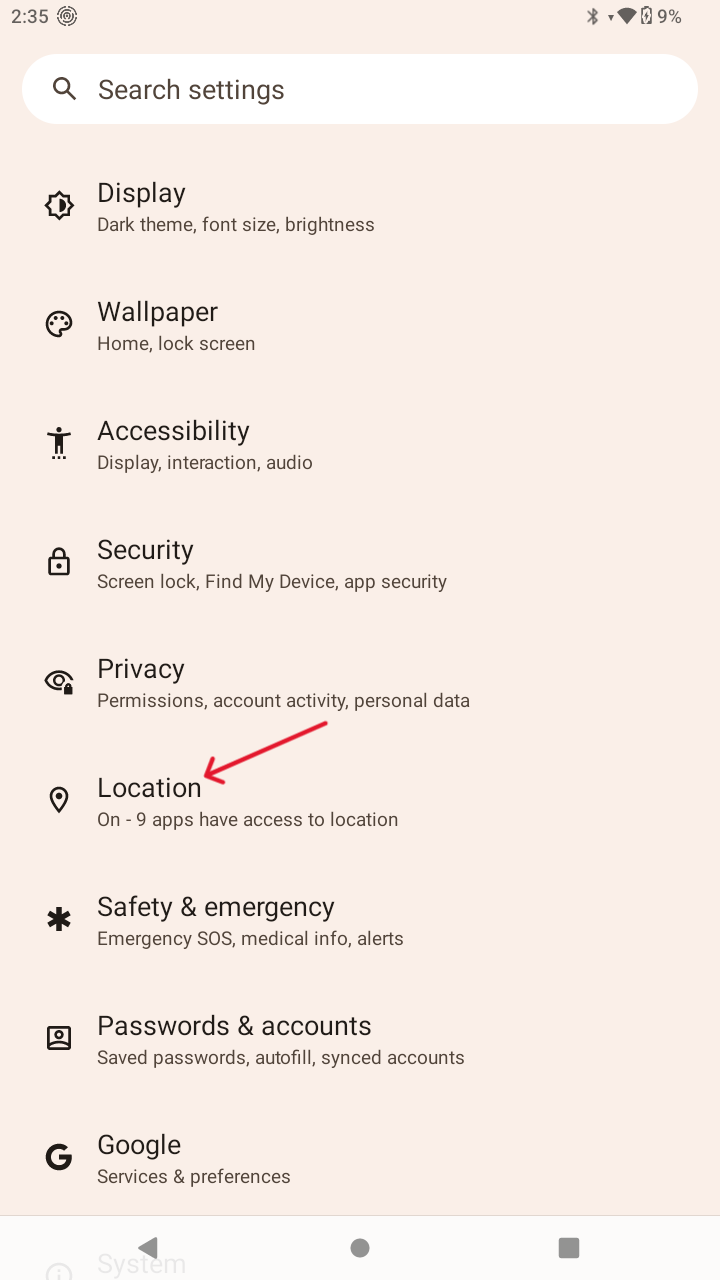
11.2. GPS Fails to Acquire Position Lock
- 11.2.1. Reboot the Device.
- 11.2.2. Confirm the GPSTune service is active (or Carpe Manager on v4b/v4c/v4d models).
- 11.2.3. Connect to Wi-Fi/cellular to download fresh A-GPS orbital ephemeris data. Without data, satellite acquisition can take up to 15 minutes.
- 11.2.4. If Location Services were toggled off, re-enable them and reboot the tablet.
- 11.2.5. Ensure clear view of open sky. Tall buildings and garage roofs block GNSS signals.
11.3. GPS Accuracy is Poor or Jumping
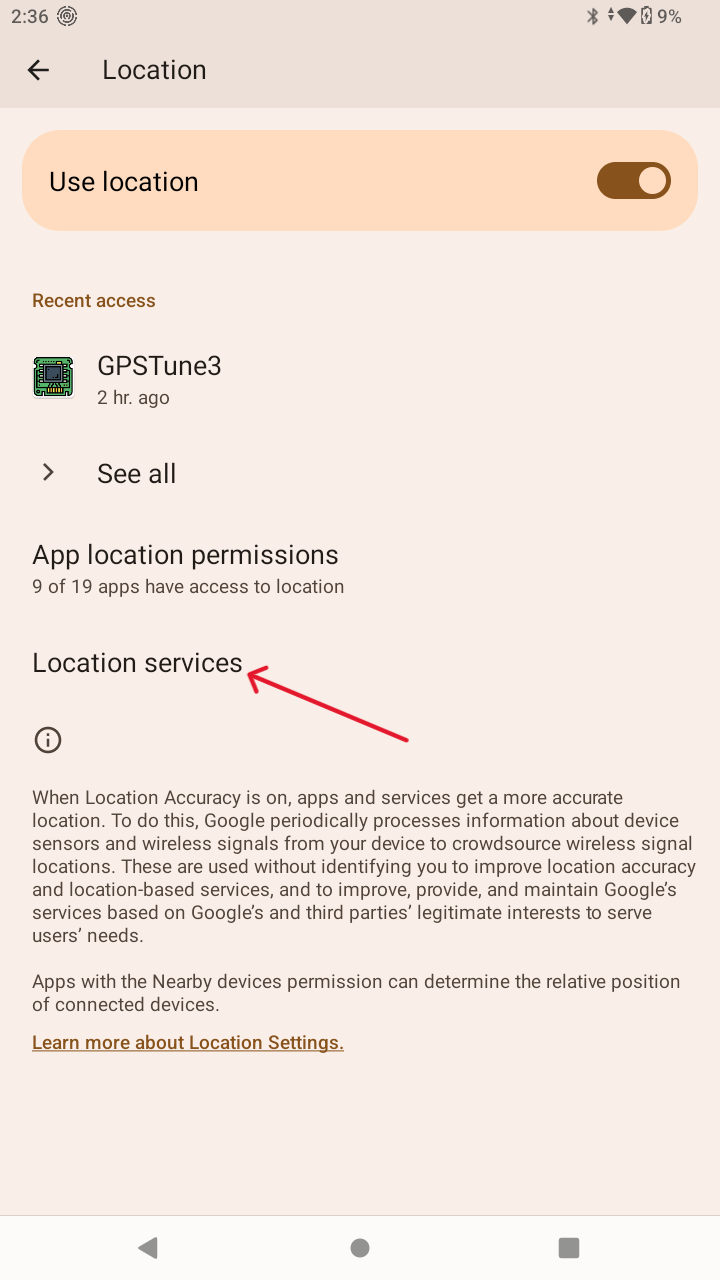
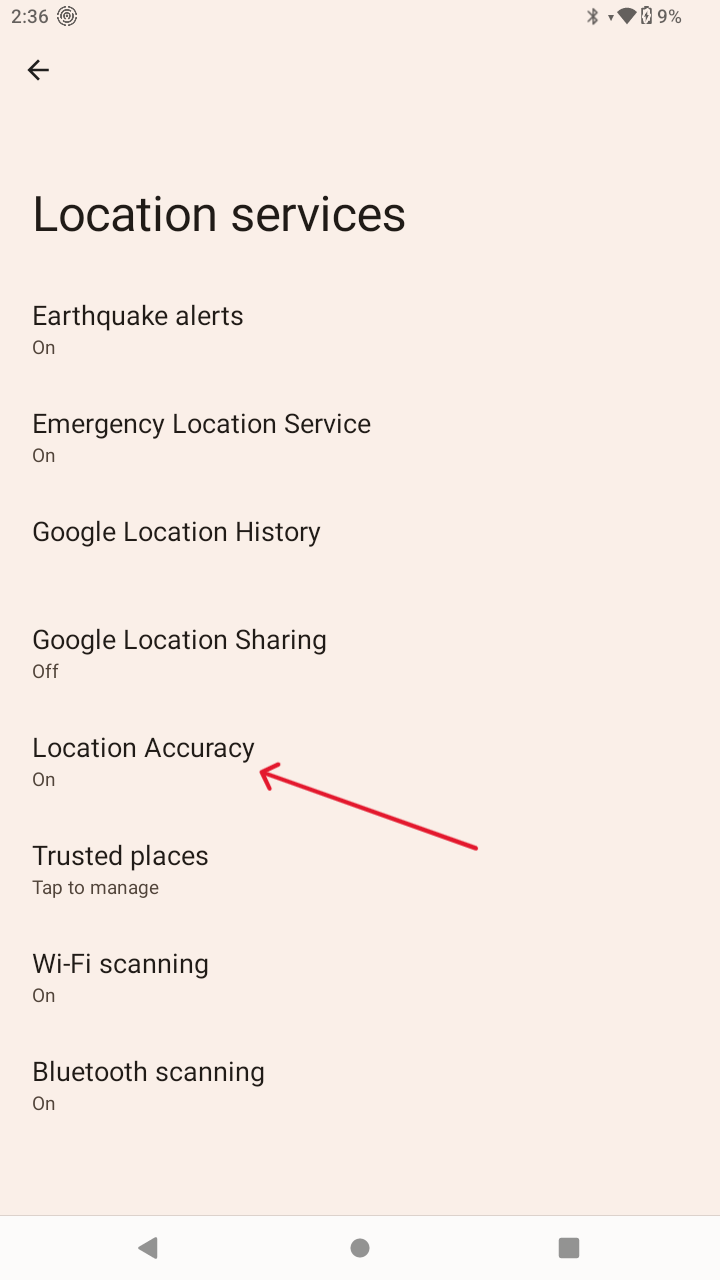
- 11.3.1. Disable Google Location Accuracy (Wi-Fi/cellular triangulation can cause erratic position jumps in rural areas).
- 11.3.2. Ensure clear line-of-sight to the sky.
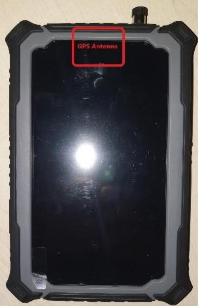
- 11.3.3. Ensure the internal antenna is unobstructed. In portrait mode, ensure the antenna edge faces upward:
11.4. Device Will Not Power On
- 11.4.1. Connect to the AC wall charger. If deeply discharged, leave connected for up to 3 hours to allow cell recovery.
- 11.4.2. Press the hardware Reset button, then hold Power for 3 seconds.
11.5. Device Shuts Down Immediately After Boot
11.5. Battery is deeply depleted. Allow the unit to charge on AC power before booting.
11.6. Device Shuts Down on Boot While Connected to Vehicle Power
11.6. Screen current draw exceeds low-battery recovery current. Turn off or lower the screen brightness immediately after boot to allow charging current to exceed baseline consumption.
11.7. Device Does Not Charge (No Charge Icon)
- 11.7.1. USB Port: Test with alternative wall sockets and verify AC charger output.
- 11.7.2. Holder / M8 Cable:
- A. Power supply LED is OFF: Check input voltage. Must be >13.6V DC. Check vehicle fuse, alternator output, and ground wires.
- B. Power supply LED is OFF but voltage is >13.6V: Check input polarity and wait 30 seconds for soft-start delay.
- C. Power supply LED is solid GREEN but tablet is not charging:
- Check intermediate connectors between holder harness and converter box.
- Test charging via M8 screw-on cable. If M8 works, Holder pogo pins are dirty, damaged, or misaligned.
11.8. Battery Percentage Drops While Charging
- 11.8.1. System power consumption exceeds 2A. Close heavy background apps and reduce screen brightness.
- 11.8.2. Unseat the tablet from the Holder and snap back into place to re-seat the pogo contacts.
- 11.8.3. Clean pogo pins and rear contacts with contact cleaner (Sections 9.10.3 & 9.10.6). Replace worn pogo harness if pins fail to spring back.
- 11.8.4. Inspect wiring harness for broken strands or loose crimps.
- 11.8.5. Measure vehicle AC ripple voltage. If AC ripple exceeds 100mV, the motorcycle voltage rectifier is failing and will disrupt the converter circuitry.
11.9. Battery Level Percentage Appears Inaccurate
- 11.9.1. Displayed percentage is an estimation; check true voltage under Carpe Manager → Power&Charge.
- 11.9.2. Allow the Carpe Manager app to perform an automated calibration cycle (Section 7.14).
- 11.9.3. Gauge calibration discrepancies do not affect actual battery runtime or cutoff protections.
- 11.9.4. The true operational range is 4.2V (100%) down to 3.5V (0% cutoff).
12. Disclaimer
12.1. Unless explicitly stated, Carpe Iter products are developed for off-road/navigation purposes and have not undergone street-homologation testing. Use at your own risk.
12.2. Position brackets to prevent blunt contact in the event of a crash. Dismount empty holders when not carrying the Device.
12.3. Motorsports entail inherent risk of injury or equipment damage during an accident.
12.4. Manuals and technical documentation are supplied exclusively in digital electronic format.
12.5. Installation requires standard mechanical aptitude. Seek professional workshop installation if uncertain.
12.6. Technical support and documentation are provided exclusively in English.
13. Manufacturer’s Warranty
13.1. We provide a worldwide warranty for manufacturing defects existing upon delivery: 2 years for EU consumers, and 1 year for commercial/B2B purchases (from dispatch date). Software and batteries are subject to specific terms below.
13.2. Battery Warranty: Batteries are covered by a limited 6-month warranty guaranteeing retention of at least 60% nominal capacity, contingent upon adherence to storage and operating guidelines.
13.3. Warranty covers functional defects precluding intended use. Cosmetic wear, paint fading, superficial oxidation, and abrasion are excluded.
13.4. Warranty coverage is conditional on compliance with manual instructions. Damage caused by improper power sources, mechanical abuse, or lack of maintenance is excluded.
13.5. No warranty is provided for third-party software.
13.6. Excludes damage caused by external forces (crashes, vibration exceeding limits, pressure washing, UV degradation).
13.7. Plastic clips, rubber bumpers, and pogo pins are consumable items.
13.8. Warranty items must be shipped to our facility with a detailed fault description. Inbound shipping costs and EU customs re-import duties are the responsibility of the claimant.
13.9. Warranty claims may be resolved by repair, monetary compensation, or replacement at manufacturer discretion.
13.10. We reserve the right to replace defective items in lieu of repair.
13.11. Valid warranty claims will be processed within 30 days of physical delivery to our service facility.
13.12. Contact support via email prior to shipping any item. Many issues can be resolved remotely without physical return.
Was this article helpful?
That’s Great!
Thank you for your feedback
Sorry! We couldn't be helpful
Thank you for your feedback
Feedback sent
We appreciate your effort and will try to fix the article