

This guide applies to the Carpe Iter Hall Effect Front Wheel Sensor. If you are using a third-party front wheel sensor, please consult the respective manufacturer for installation instructions.
Sensor Installation
-
Install the locking nut onto the sensor screw with the flange facing the end of the screw:

-
Screw the sensor into the designated port on the brake caliper:

-
Ensure that the sensor screw is flush with the inside face of the brake caliper. If it protrudes, it may obstruct brake function or collide with the magnet and cause damage. Once flush, secure the sensor screw in place by tightening the locking nut:


-
Route the sensor cable along the brake hose and secure it firmly using cable ties:


-
Rotate the handlebars fully from left to right. Verify that the cable is not under tension, does not restrict steering travel, and has adequate slack without risking snagging on moving motorcycle components.
-
Connect the sensor cable to the Terrain Command III or the BMW Control Hub (connectors are fully compatible). Do not modify the connectors.
Magnet Installation
If your brake disc is pre-drilled for magnet installation, use a circlip magnet. We supply the two most common standard sizes: 9.5mm and 9mm. This is the recommended and most secure method.
If your brake disc cannot accommodate a standard circlip magnet, you may adhere one of the included magnets directly onto the brake disc or disc carrier plate at your own discretion:
WARNING: Adhering a magnet directly to the brake disc carries inherent operational risks. While the included magnets are ultra-thin, improper installation could obstruct braking components or cause the magnet to dislodge during riding. You MUST test brake operation thoroughly at low speeds in a safe environment prior to riding.
-
Place one of the provided magnets onto the brake disc or carrier plate (do not apply adhesive yet):

-
Ensure the center of the magnet aligns within 10mm of the center of the sensor screw. Optimal performance is achieved when the magnet passes directly over the sensor screw. If disc geometry prevents direct alignment, ensure at least partial overlap. Avoid placing the magnet in direct contact with brake disc mounting bolts or other steel hardware to prevent secondary magnetization and erroneous pulse counts.
-
Rotate the front wheel manually to confirm that the magnet does not make contact with the brake caliper, brake pads, or the sensor screw. If the magnet is displaced during rotation, adjust the mounting position.
-
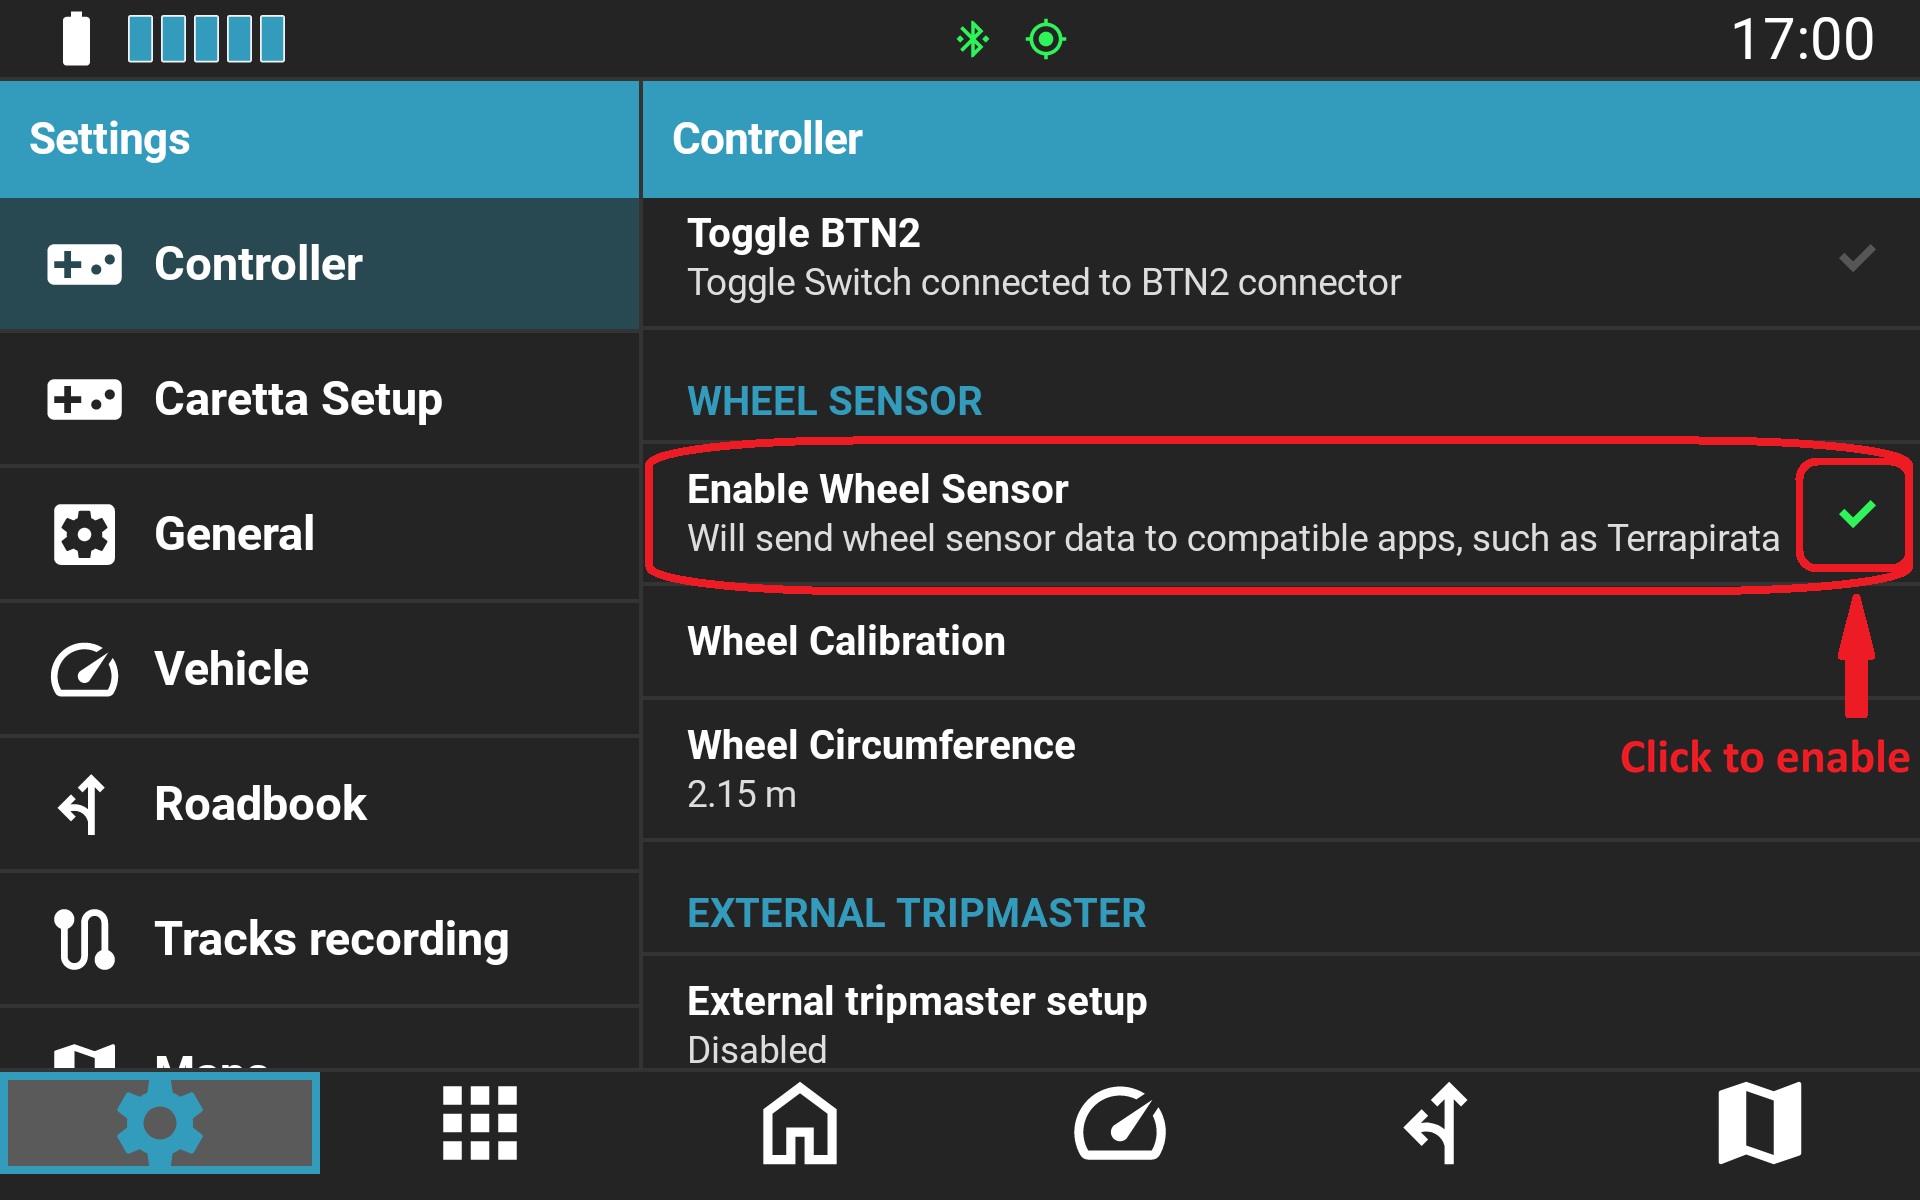
Connect your Terrain Command or BMW Control Hub to the NGH app, open Settings, and perform the following verification:
-
Enable Wheel Sensor:
-
Spin the front wheel and verify that the sensor pulse count increments by exactly 1 per wheel revolution without skipping or double-counting. If pulses are not detected, readjust the magnet alignment (repeat steps 2 and 3).
-
-
Once the optimal position is confirmed, mark the exact location on the brake disc and remove the magnet.
-
Degrease the marked area thoroughly using a quick-drying solvent, and lightly abrade the surface with fine-grit sandpaper to ensure strong adhesive bonding.
-
Apply a drop of high-strength acrylate/epoxy adhesive to the magnet and press it firmly against the prepared surface on the brake disc. Maintain pressure until initial bonding takes hold (a spare magnet is included in the package if needed):

-
Allow the adhesive to cure completely, then rotate the wheel again to re-verify clearances.
-
Calibrate the sensor using one of the following methods:
-
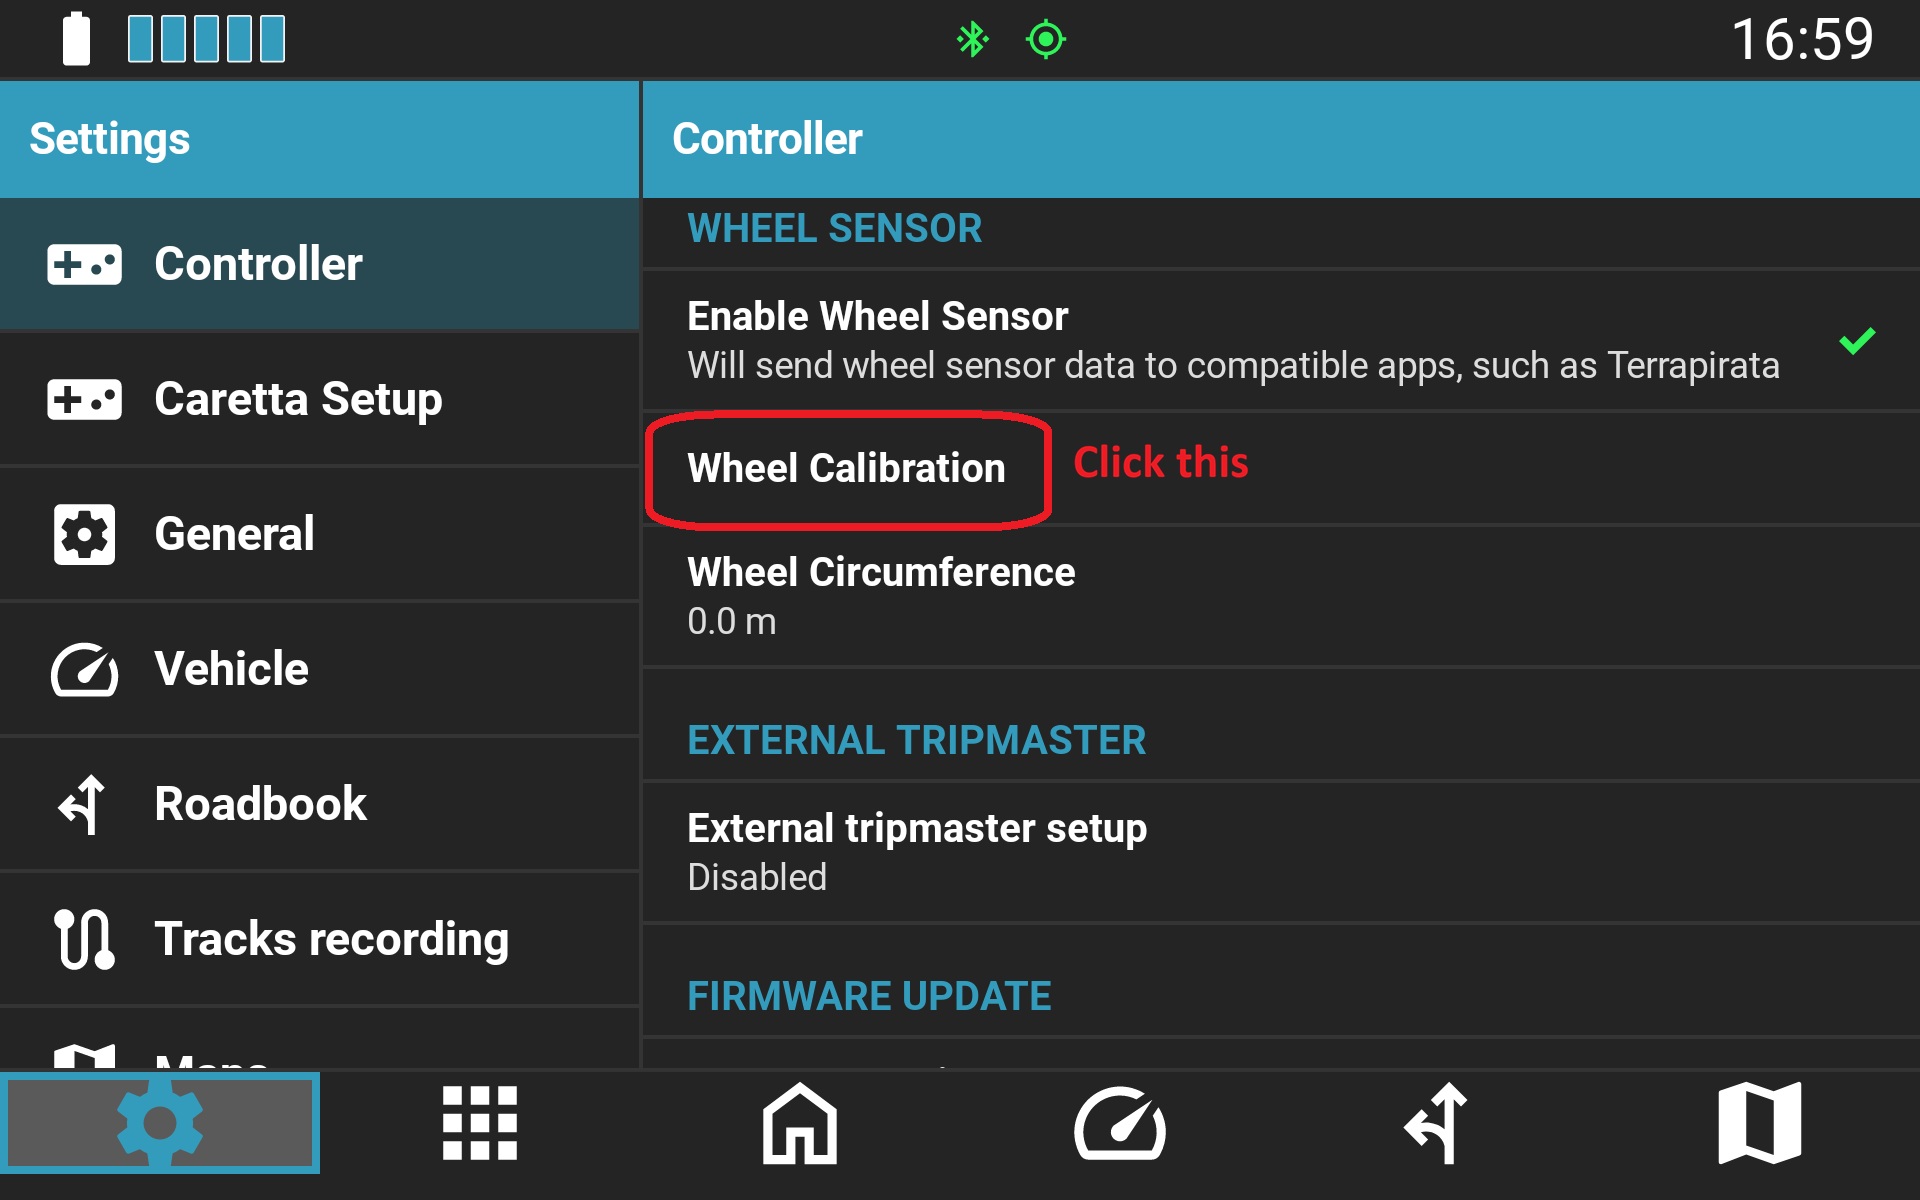
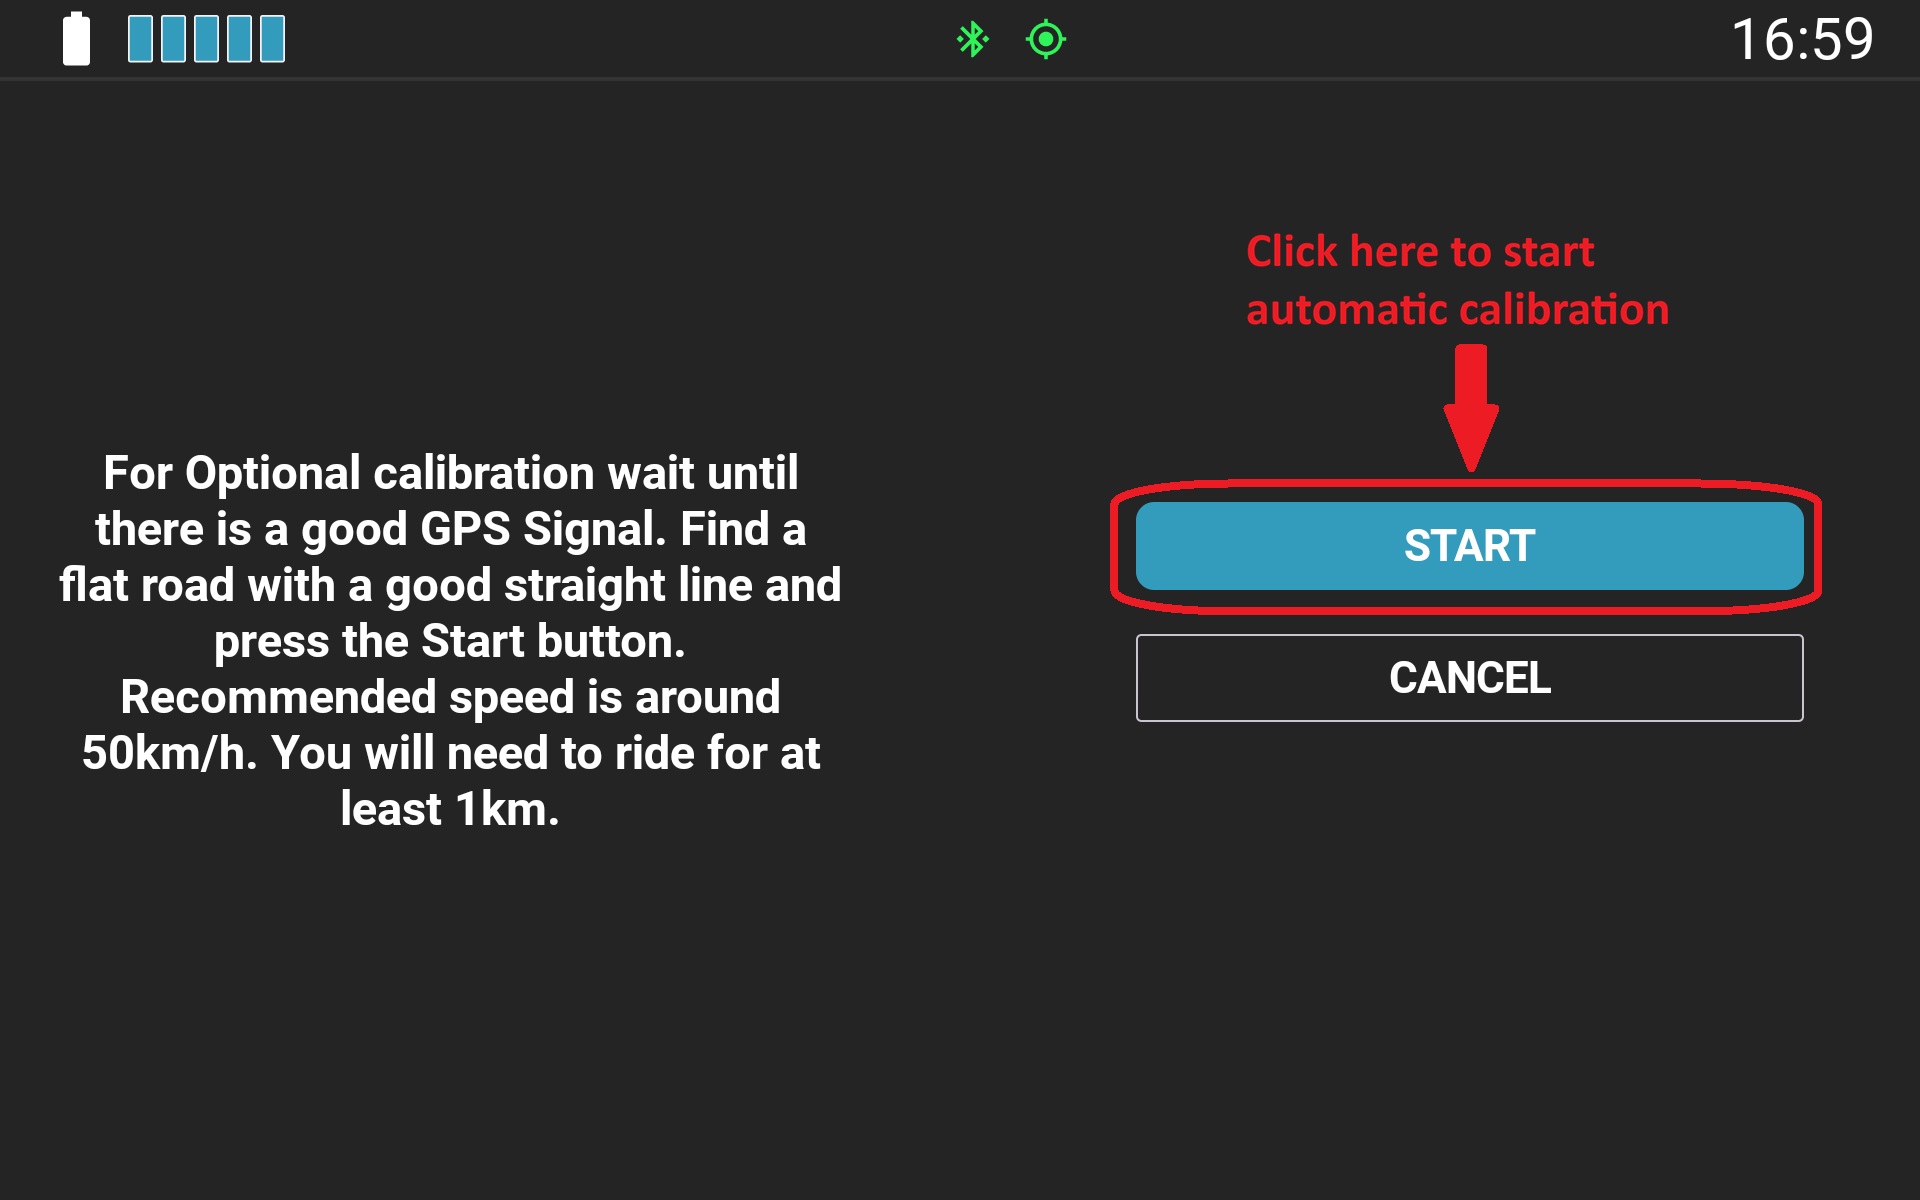
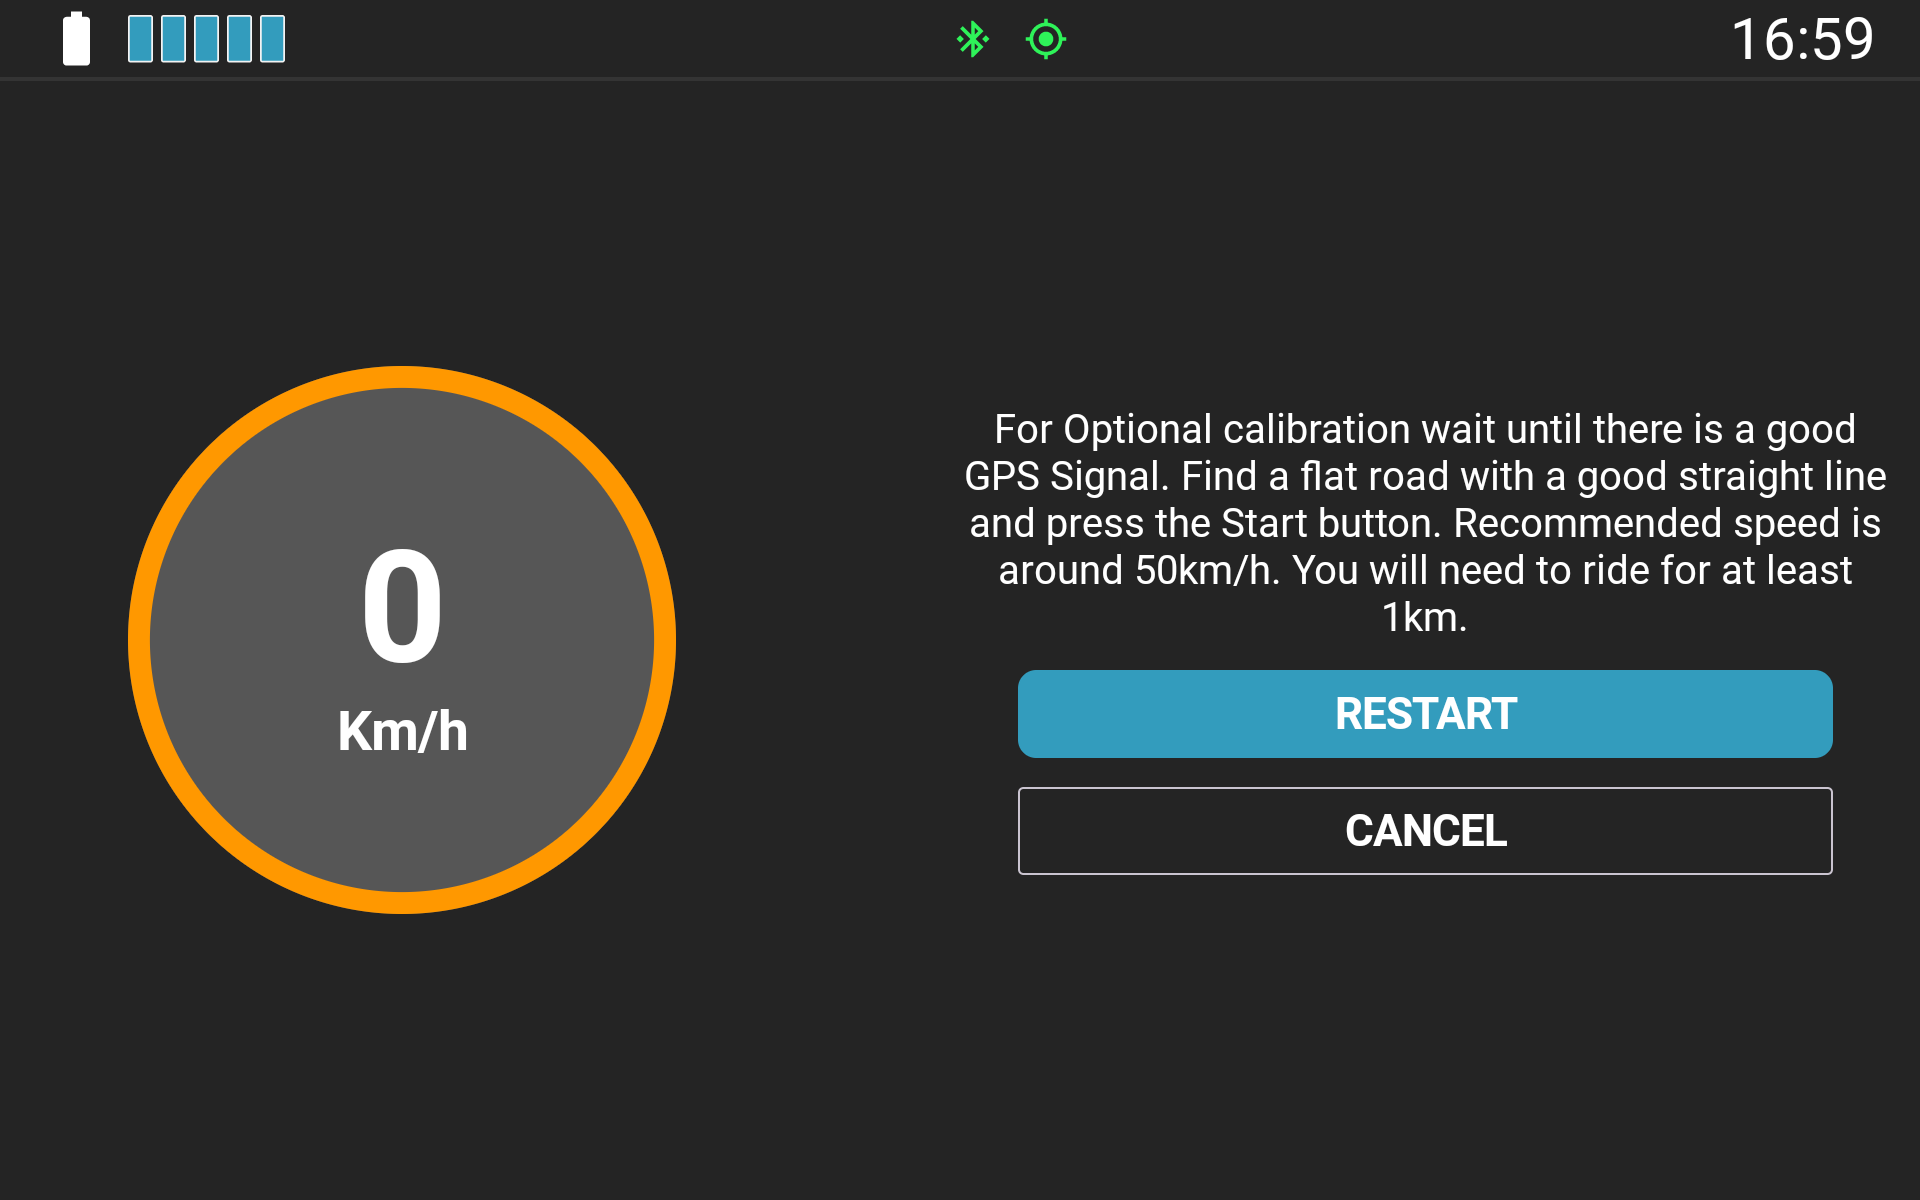
Automatic Calibration: Select Wheel calibration in the NGH settings and follow the on-screen instructions (requires riding a distance of approximately 2 km).
-
Manual Circumference Entry: Select Wheel circumference and enter the precise rolling circumference in meters. Note: Measure the actual outer circumference of the mounted and inflated tire, not the rim diameter (a standard 21-inch rim with an off-road tire typically ranges between 2.14 m and 2.18 m).
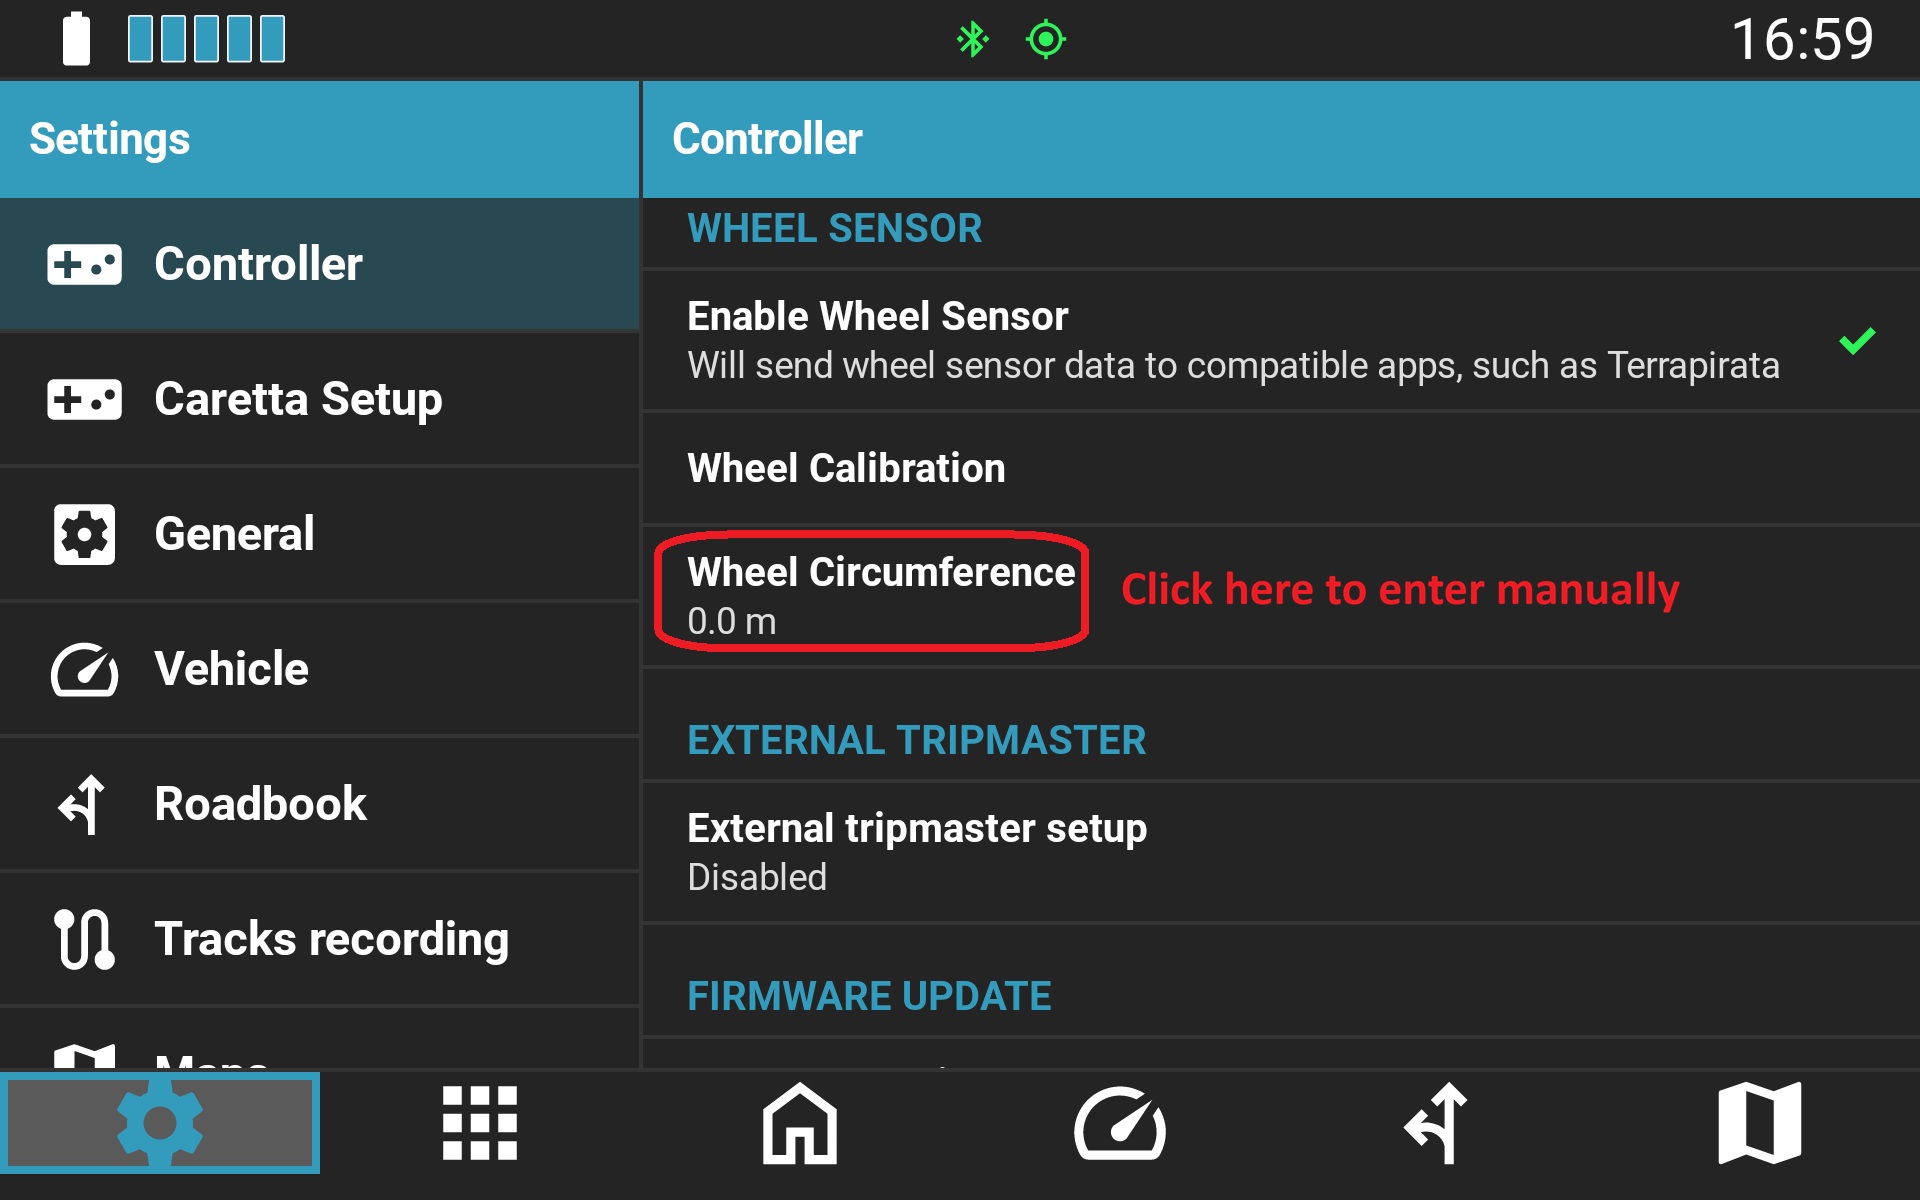
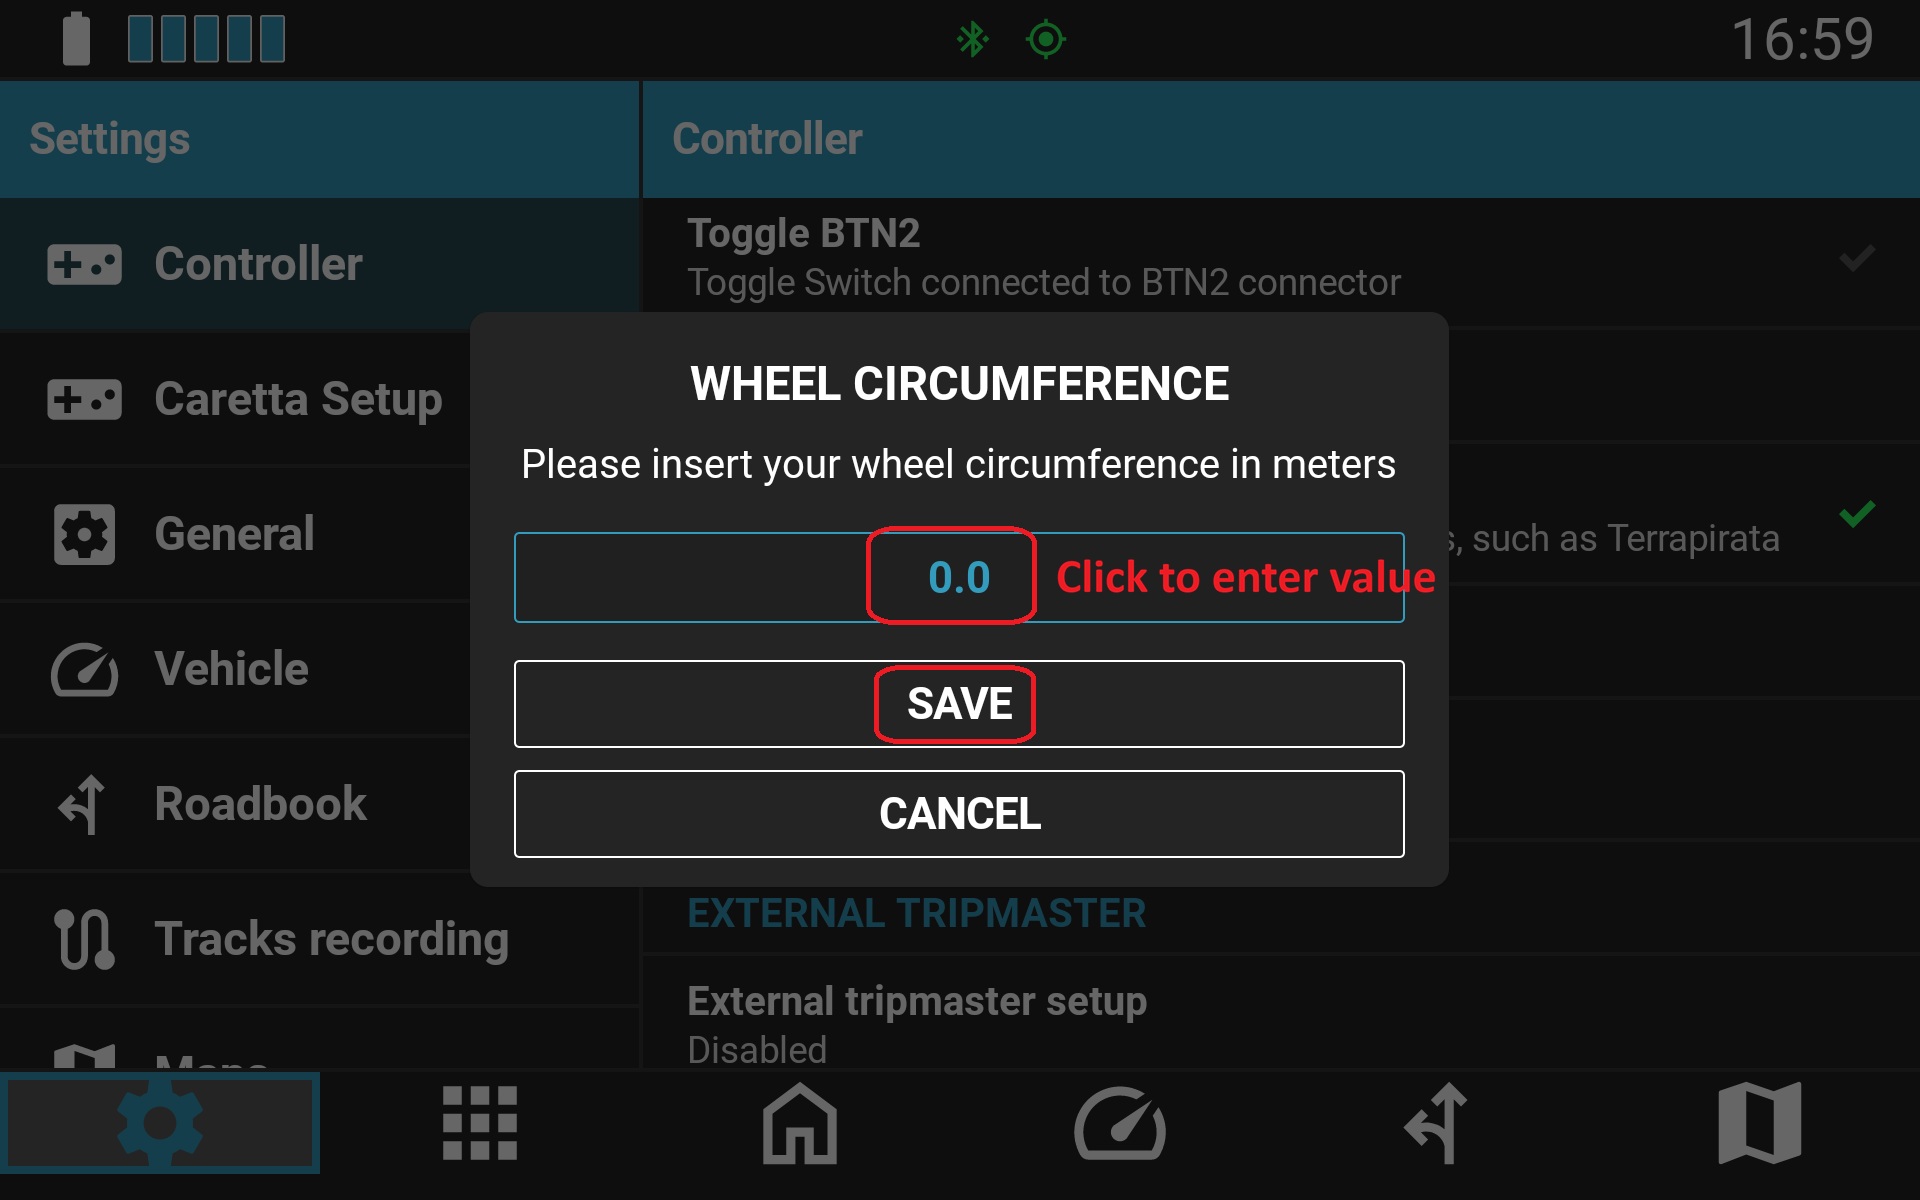
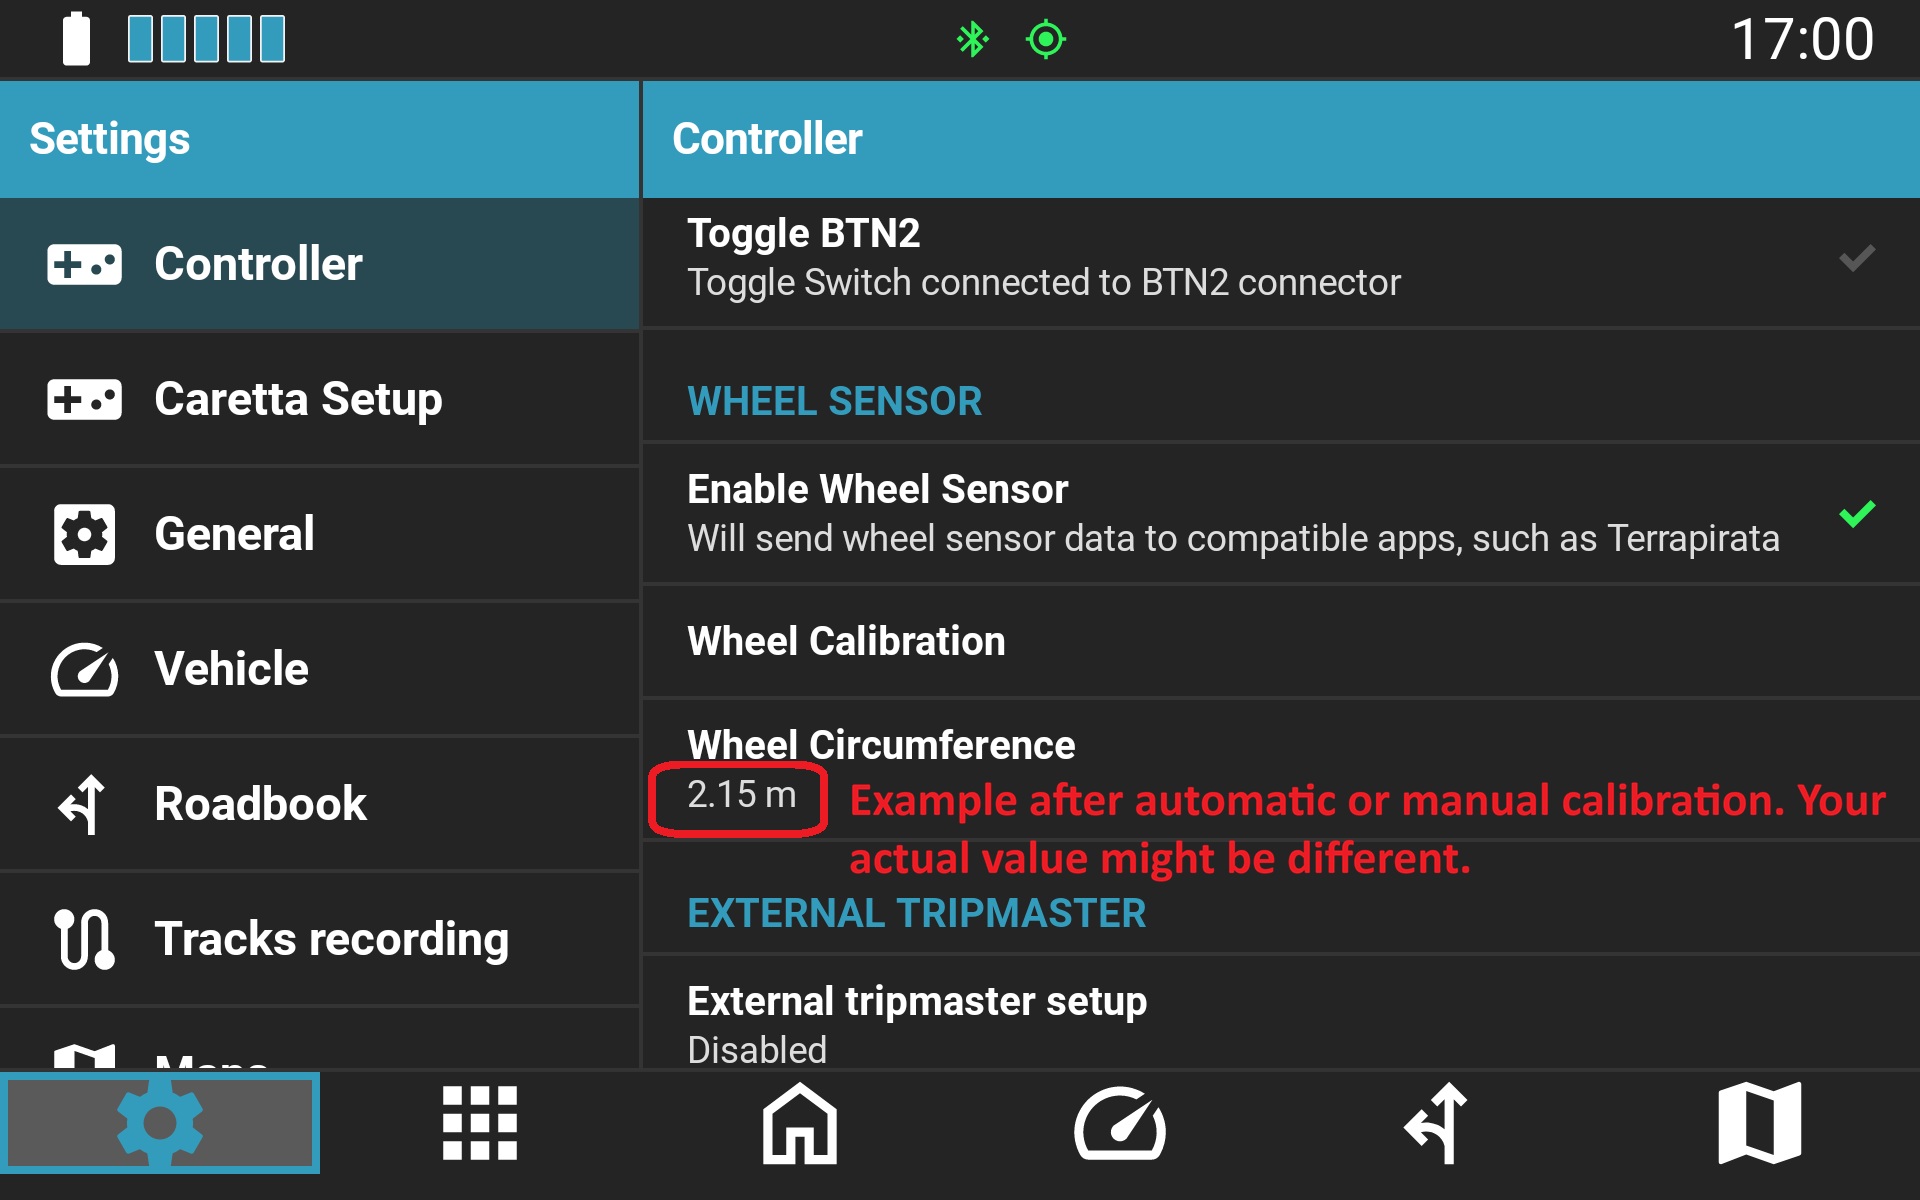
NOTE: Accurate circumference configuration is critical. As aggressive off-road tires wear down, rolling circumference can decrease by over 5%, which directly affects speed and odometer accuracy. Re-calibrating periodically over the tire's lifespan is recommended.
-
Automatic Calibration: Select Wheel calibration in the NGH settings and follow the on-screen instructions (requires riding a distance of approximately 2 km).
IMPORTANT: The Hall Effect sensor requires active external power supplied to the controller (it will not operate reliably on the controller's internal backup battery). For sensor data to be passed to navigation applications, the Carpe Iter NGH app must be installed and the Carpe Iter NGH Accessibility service must be running.
Troubleshooting
No sensor count increment or intermittent pulse detection during calibration
- Verify that the controller is connected via Bluetooth to your Android device (e.g., Caretta).
- Ensure the controller is powered via the motorcycle's 12V supply (switch on ignition or start engine if wired to a switched circuit).
- Check magnet-to-sensor alignment and ensure the gap is within operating tolerance.
Sensor double-counting (more than 1 pulse per wheel revolution)
- Verify that the magnet is not in direct contact with steel hardware (such as disc mounting bolts), which can induce secondary magnetic poles.
- If using a third-party magnet, ensure its diameter does not exceed 10mm.
- Check for secondary magnets or dislodged magnetic fragments on the wheel assembly.
- Increase the air gap between the sensor screw and the magnet by threading the sensor screw slightly outward so it sits recessed inside the caliper mount.
Inaccurate distance or speed readings
- Recalibrate the wheel sensor or re-measure the rolling circumference of the mounted tire.
Was this article helpful?
That’s Great!
Thank you for your feedback
Sorry! We couldn't be helpful
Thank you for your feedback
Feedback sent
We appreciate your effort and will try to fix the article