

Version: v1.5
WARNING: STRONG MAGNETS INSIDE
Do not place near pacemakers or other devices/objects sensitive to magnetic fields.
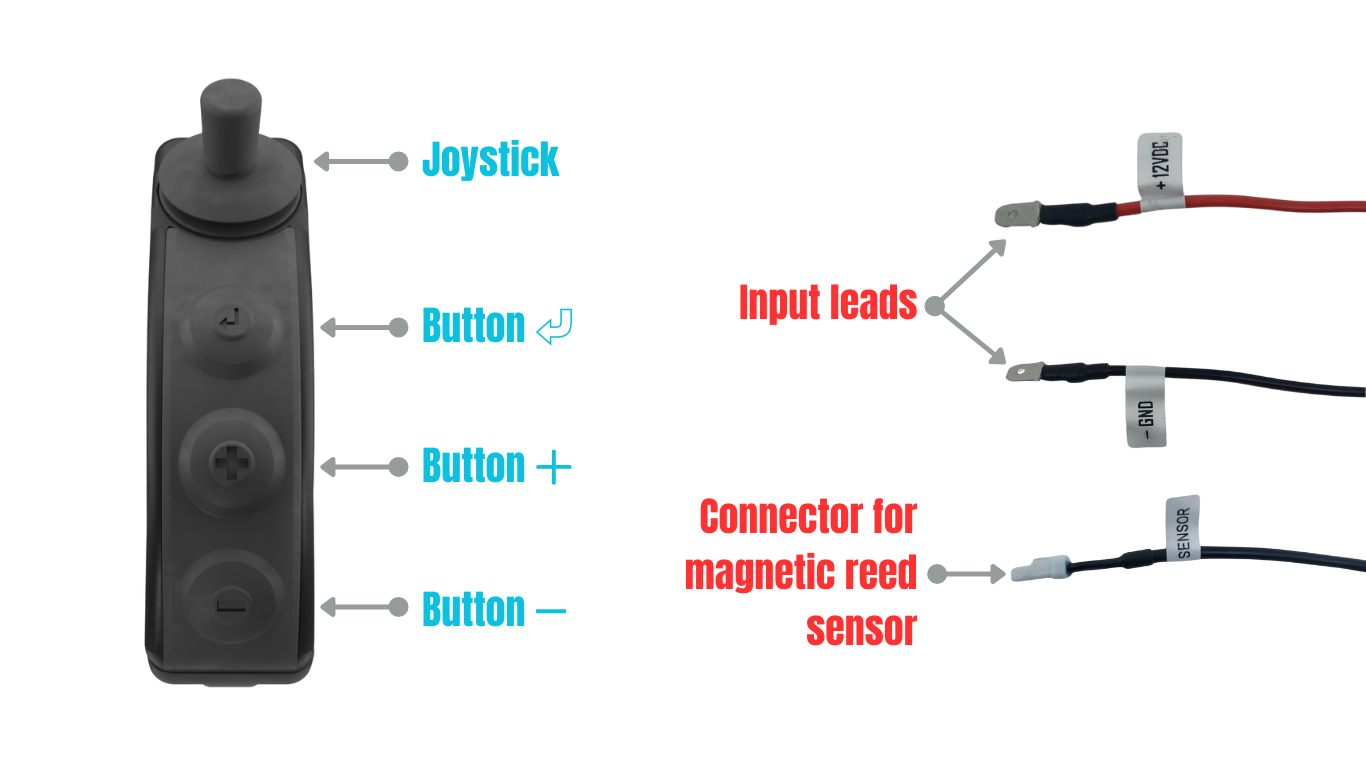
1. Description
2. Mounting
- Handlebar Compatibility: Adventure Control ("Adv Ctrl") is designed for permanent installation on standard 22mm diameter handlebars.
- Positioning: Ensure adequate space on the handlebar so that Adv Ctrl fits neatly between the handlebar grip and the stock switch cluster.
- Ergonomic Angle: Depending on your riding style (standing on footpegs vs. seated), rotate Adv Ctrl so the control elements are within comfortable reach of your thumb.
- Fastening: Use the provided bracket and M4 screws to secure Adv Ctrl to the handlebar. Do not overtighten, as excessive torque can crack the bracket or controller housing. Required tool (not included): 2.5mm HEX key.
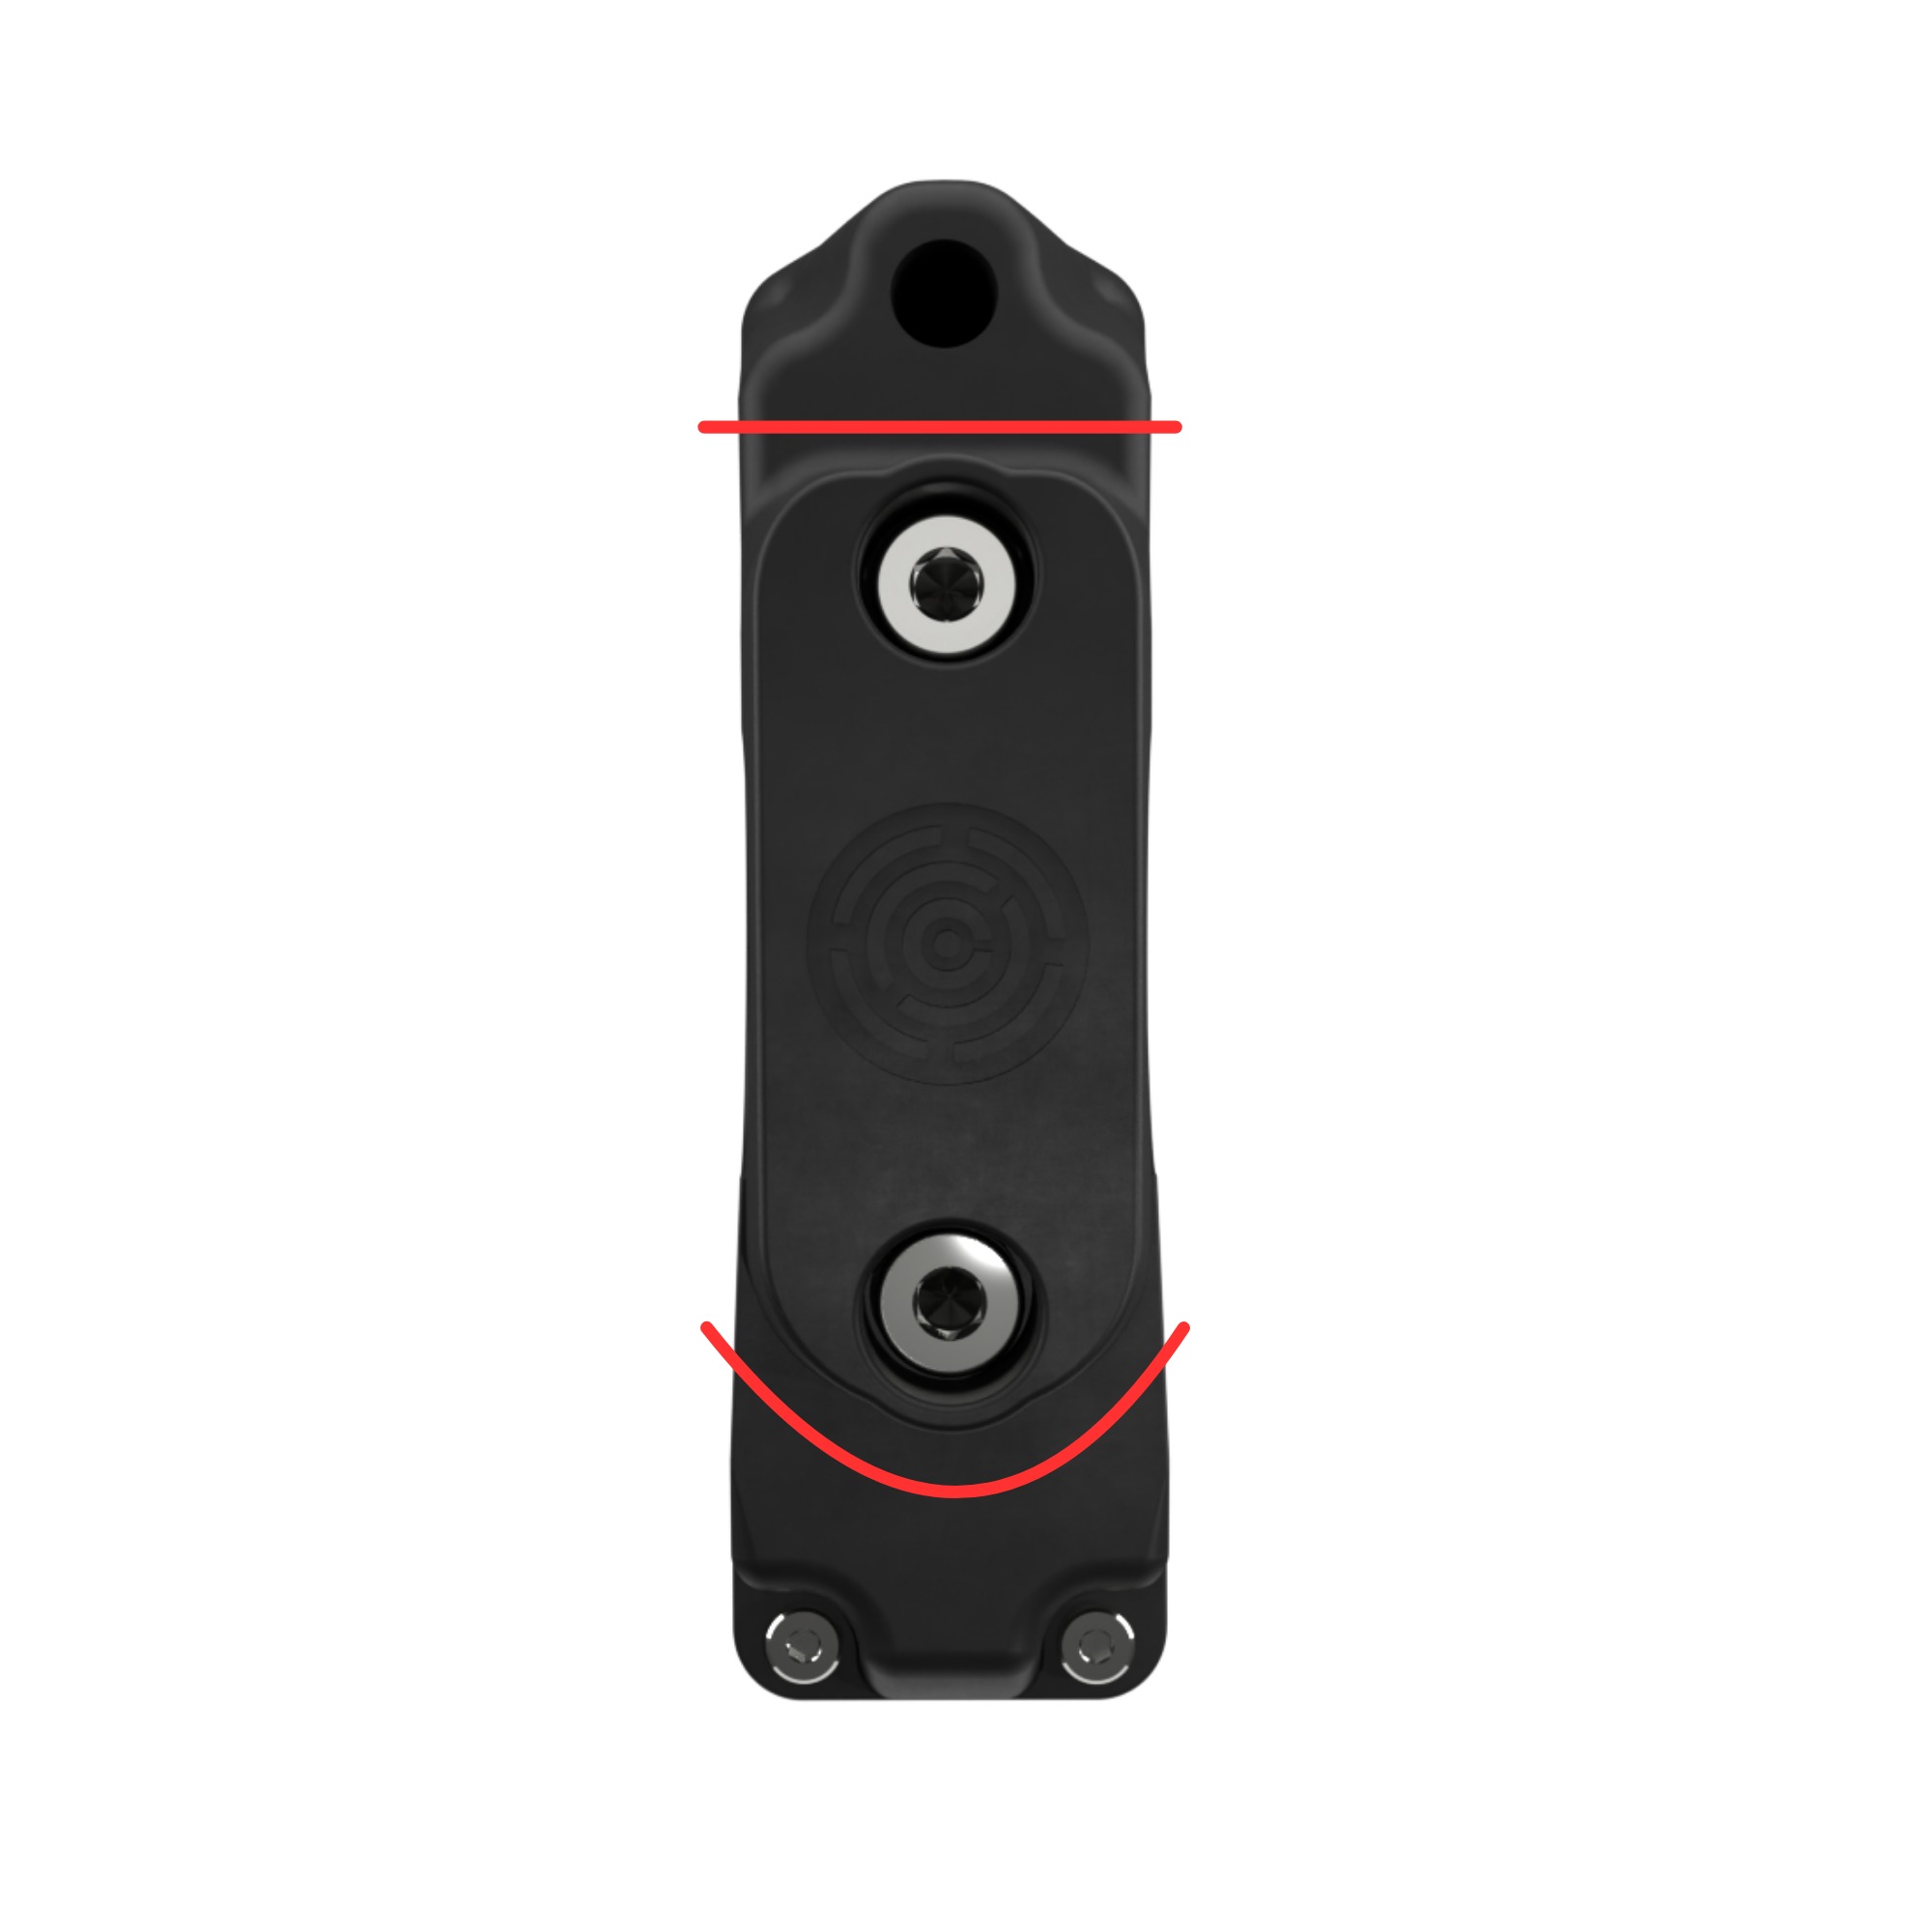
- Bracket Orientation: The included retaining bracket is not ambidextrous. Ensure correct orientation during installation:
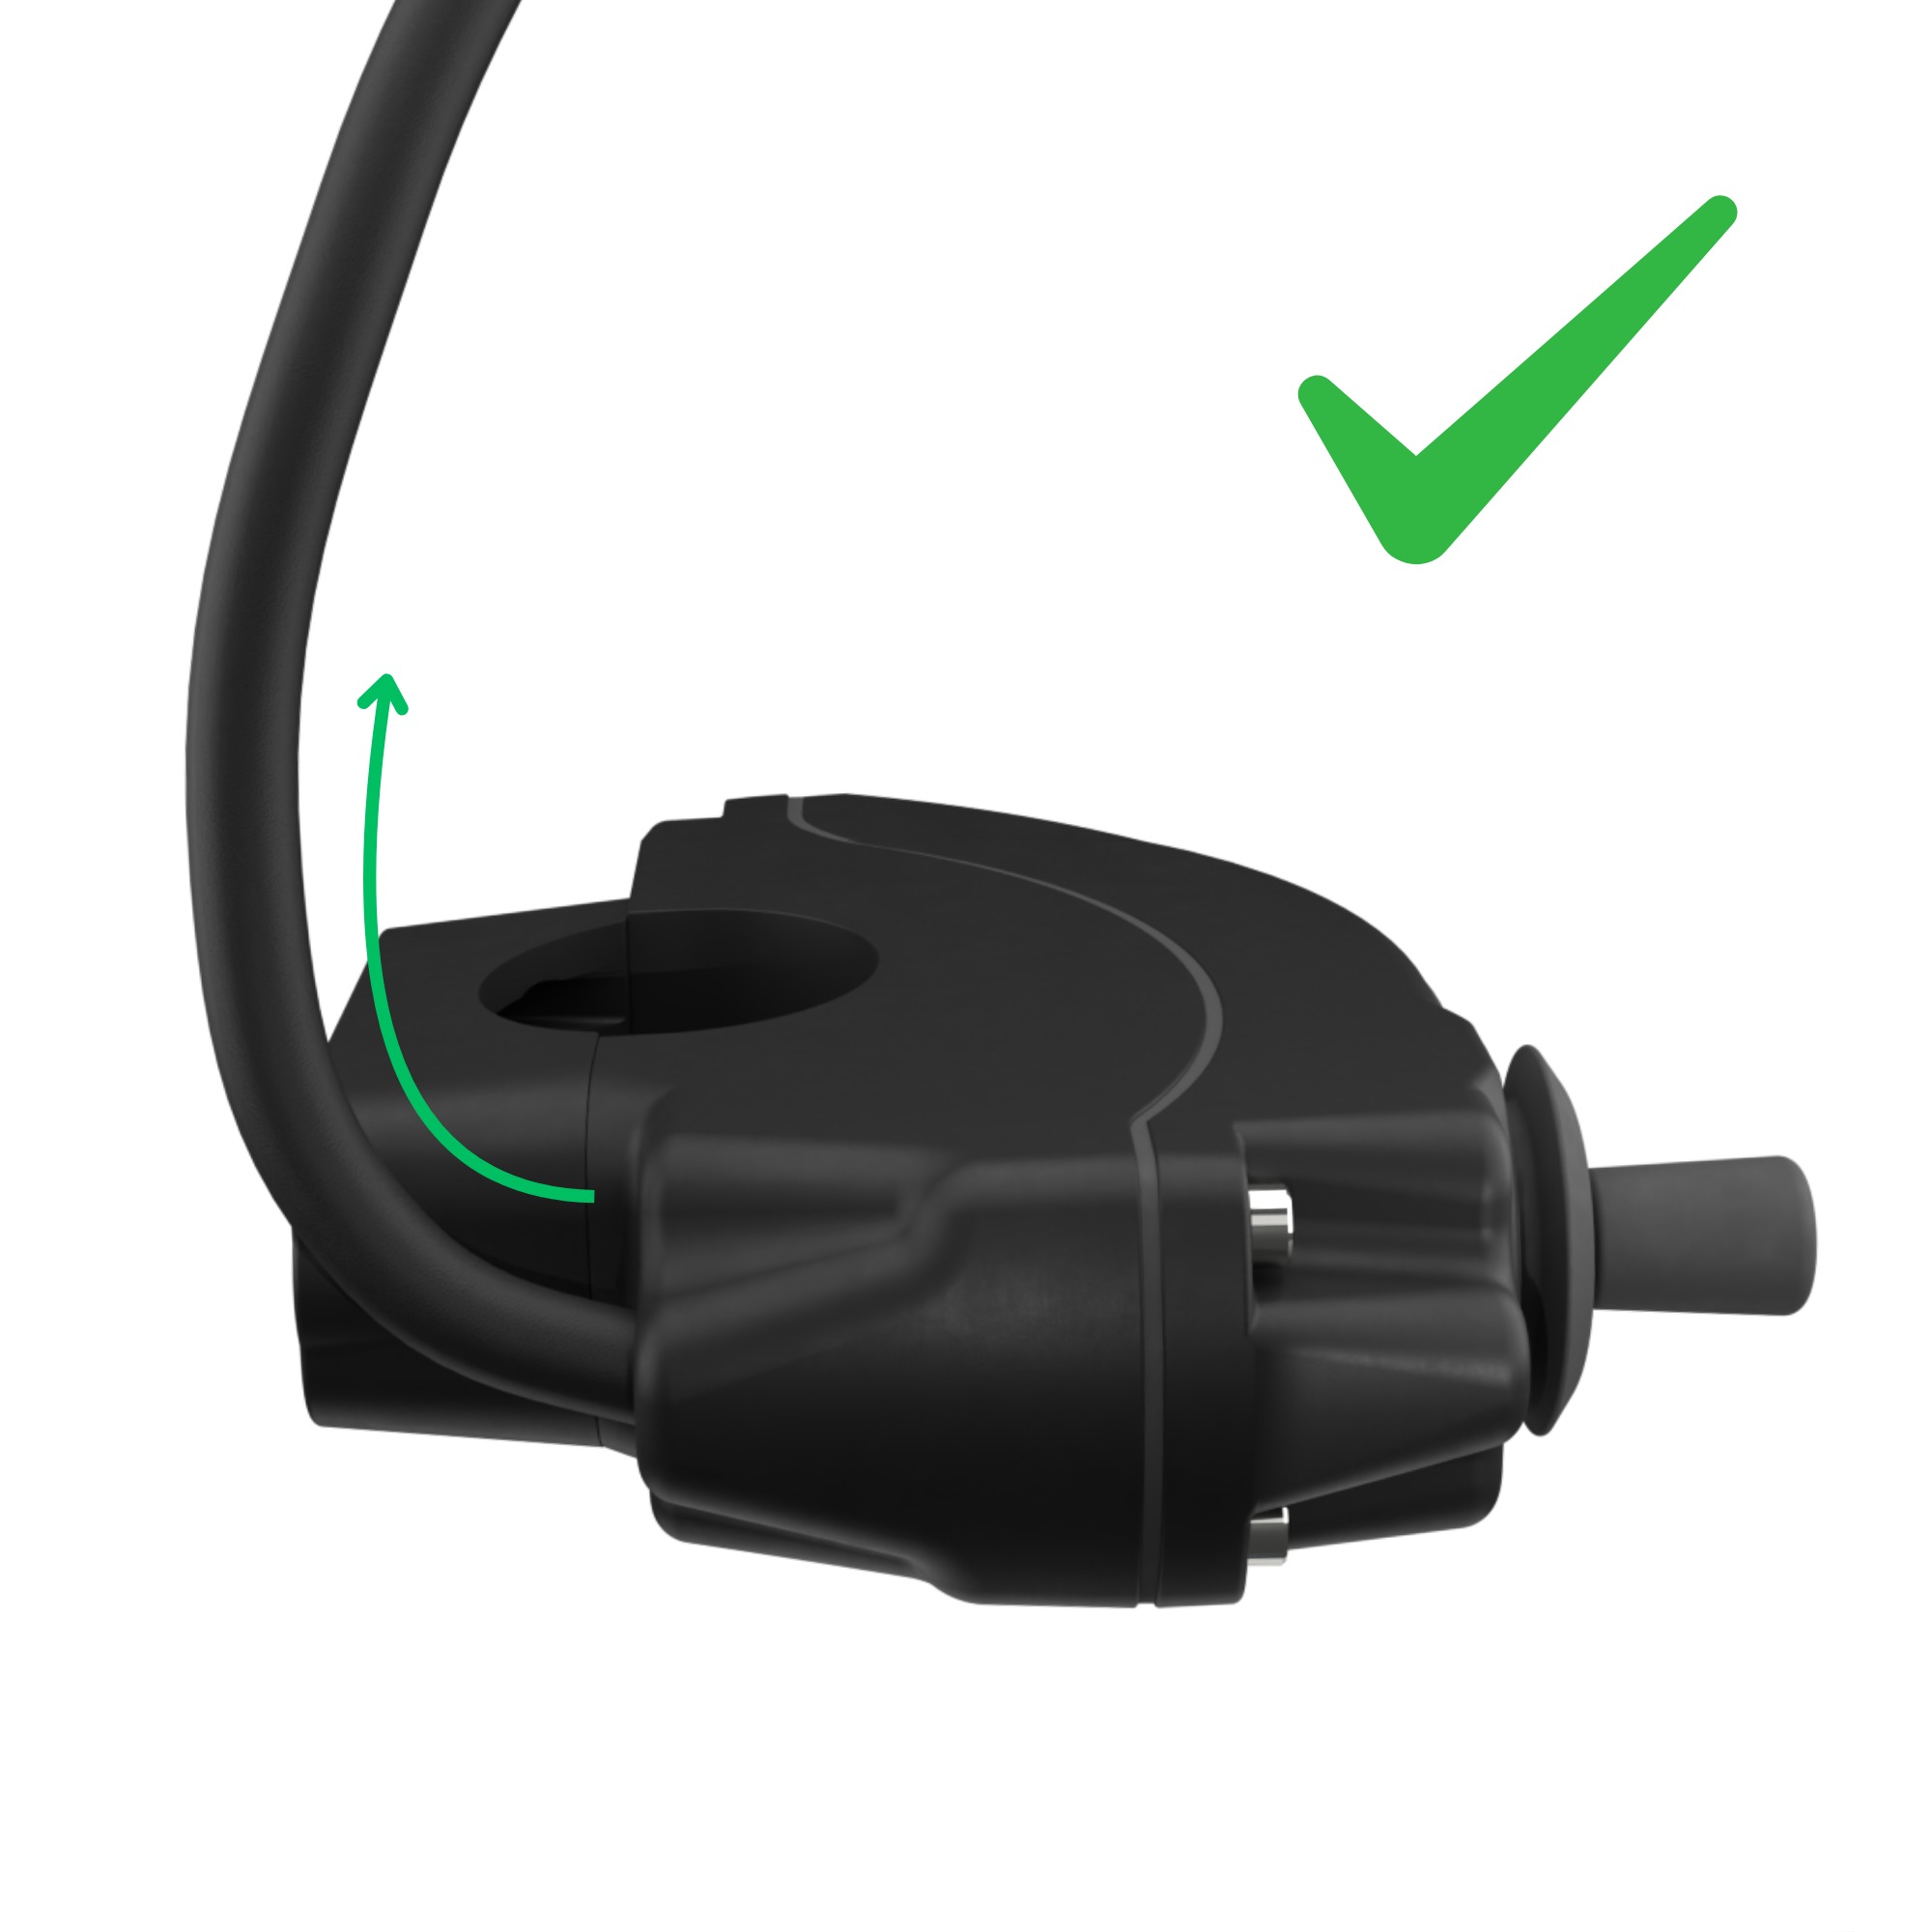
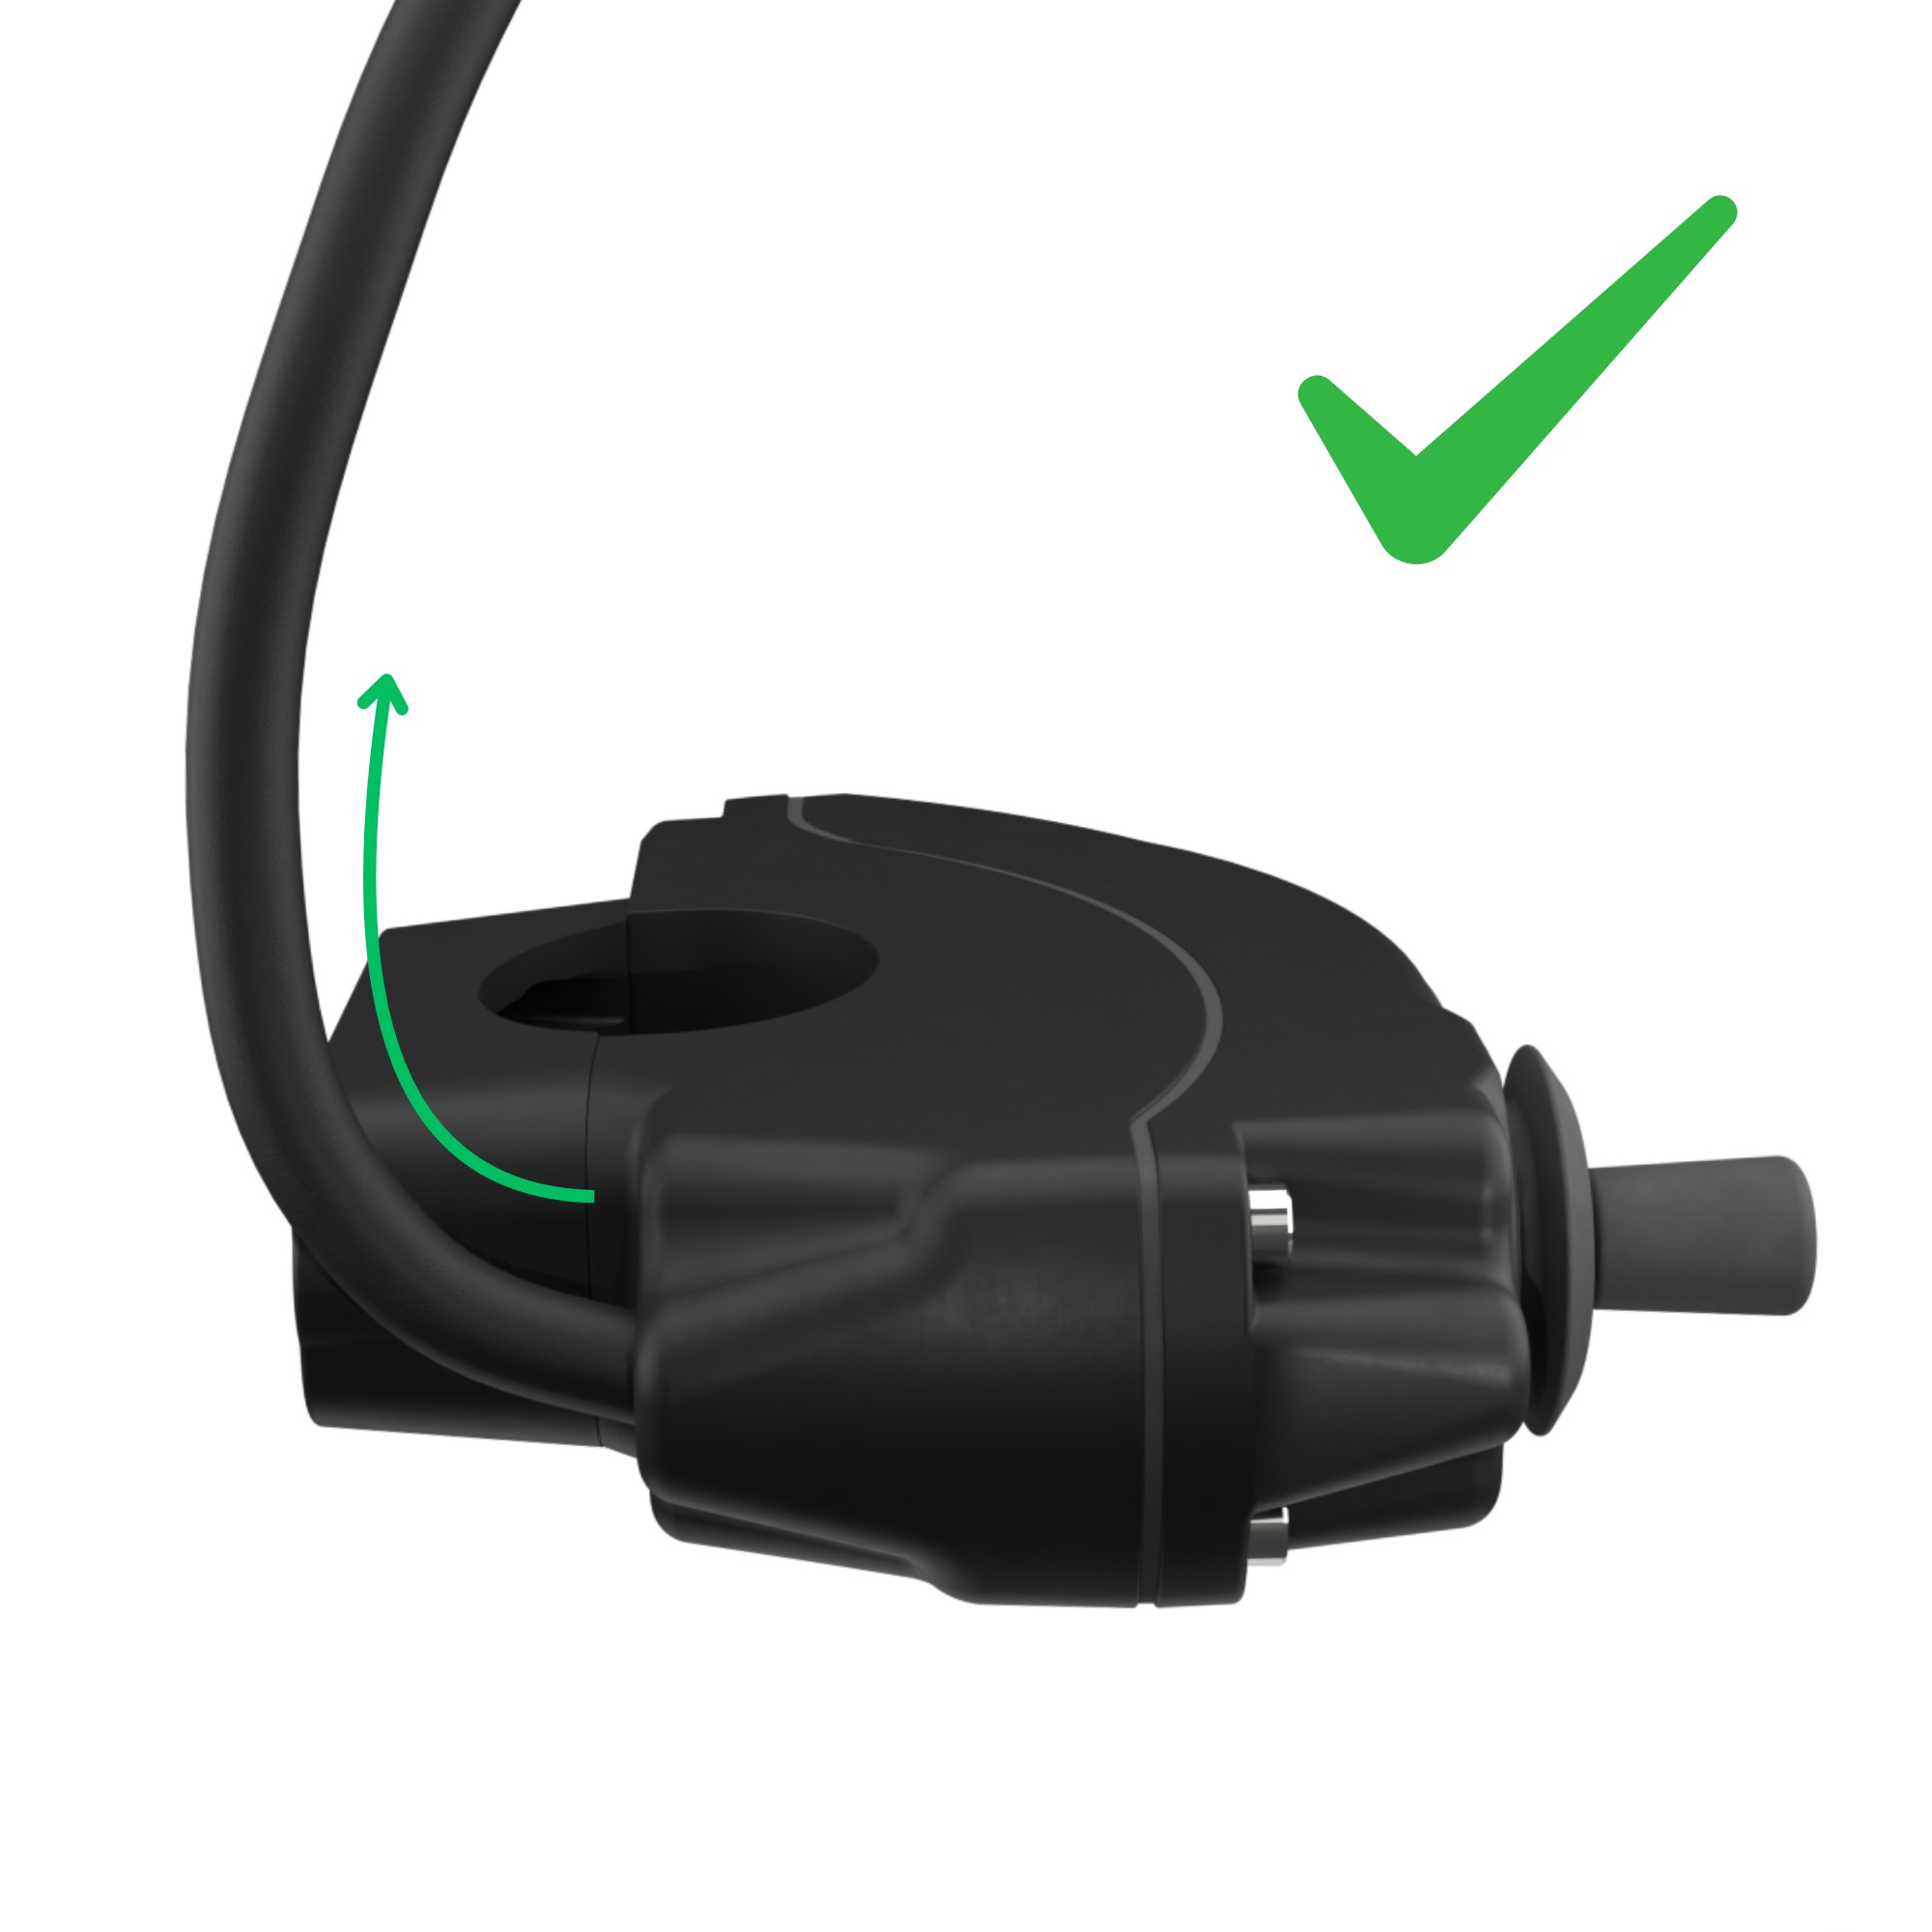
- Cable Routing: Secure the Adv Ctrl cable assembly along the handlebar using zip ties. Do NOT apply excessive strain or pull tightly on the cable:
- Power Connection: Connect the input leads to the motorcycle electrical system (12V DC nominal voltage required).
- Positive terminal: Marked 12VDC
- Negative terminal: Marked GND
- Always connect GND first.
Tip: Apply dielectric grease to the terminals prior to installation to ensure good electrical contact and prevent oxidation.
- Terminals: The input power leads use 6.3mm Faston-style spade connectors.
- Power Supply Considerations: Adv Ctrl does not contain an internal battery.
- Switched Power (Ignition-controlled): Turns off with ignition; consumes no power when parked.
- Unswitched Power (Direct/Auxiliary): Remains powered at all times. In Idle mode, average consumption is ~2mA (dropping to ~10µA in deep idle). While minimal, prolonged storage (several weeks) may contribute to battery drain on smaller motorcycle batteries.
- Direct Battery Connection: When connecting directly to the battery, an inline fuse (max 5A) MUST be installed between Adv Ctrl and the battery. You may use the optional Carpe Battery Extension Cable (sold separately).
- Optional Wheel Sensor: If using the optional front wheel speed reading feature, connect a standard 2-wire magnetic reed sensor to the connector marked SENSOR. The SENSOR port is polarity-agnostic and not required for standard Bluetooth controller operation.
CRITICAL WARNING: DO NOT connect the SENSOR port to the motorcycle's stock wheel speed sensor or electrical wiring. Incompatible voltage levels will destroy the controller.
3. Operation & Use
- Device Pairing: Adv Ctrl operates exclusively paired with an Android host device (smartphone, tablet, or Caretta GPS). Refer to the pairing guide: How to connect Carpe Iter remote controller.
- Companion App: For full functionality, install the companion software – NGH (Next-gen HUD). See: NGH support articles.
- Automatic Reconnection: Once paired, Adv Ctrl reconnects automatically whenever powered and within Bluetooth range of the host device.
- Unpairing: To permanently disconnect Adv Ctrl from your Android device, unpair/forget it in your device's Bluetooth settings.
- Automatic Initialization Routine:
- 3.5.1. Active mode is indicated by a blue LED blink on Button ↵ and green LEDs on Button + and Button -. (Triggered on power-up or waking from Idle mode).
- 3.5.2. The controller performs an instant self-test checking input voltage and calibrating the joystick. Completion is indicated by an LED color code corresponding to input voltage (see Section 4.3.7).
- 3.5.3.
IMPORTANT: DO NOT move or operate the joystick during the initialization routine, or calibration will fail. Wait 2 seconds until LEDs show a steady color.
- 3.5.4. Once initialized, Adv Ctrl is immediately ready for use.
- 3.5.5. Once connected to the host Android device, LEDs switch to the user-selected backlight color (default: white), typically within 1 second after initialization.
- 3.5.6. Button presses are visually confirmed by a temporary increase in LED brightness on the pressed button.
- 3.5.7. Avoid pressing multiple button combinations simultaneously during normal operation.
- Power Saving Features:
- 3.6.1. Adv Ctrl features two power-saving states: Low Power Mode and Idle Mode.
- 3.6.2. In Idle Mode, power consumption drops to approximately 10µA, preventing battery drain during extended connection.
- 3.6.3. In Power Saving Mode, button backlights turn off while maintaining active Bluetooth connectivity.
- 3.6.4. To wake Adv Ctrl from Idle Mode, press Button ↵ (runs the quick initialization routine).
- 3.6.5. Idle Mode triggers automatically after a period of user inactivity, regardless of battery voltage.
4. Settings & LED Indicators
4.1. Default Configuration
Adv Ctrl is pre-configured and ready to use out of the box without mandatory software configuration.
4.2. Customization via NGH
Use the NGH app to configure the following settings:
- 4.2.1. Joystick sensitivity
- 4.2.2. Button backlight color
- 4.2.3. Button backlight brightness
- 4.2.4. Enable/Disable Idle mode
4.3. LED Color Codes
- 4.3.1. Steady Backlight Color (All LEDs): Connected via Bluetooth, ready for operation (default: White).
- 4.3.2. Rapid Blue Blink on Button ↵: Bluetooth pairing mode active.
- 4.3.3. Rapid Blue Blink on Button ↵ + Green/Red on Other LEDs: Initialization routine running / Bluetooth connection lost.
- 4.3.4. Steady Blue on All LEDs: Hardware setup mode.
- 4.3.5. No Backlight, Bluetooth Connected: Power saving mode active.
- 4.3.6. No Backlight, Bluetooth Disconnected: Idle mode or unpowered. Press Button ↵ to wake; if no LED lights up, verify the power connection.
- 4.3.7. Battery / Input Voltage Indication (displayed post-initialization with engine OFF):
- 3 Green LEDs: Voltage > 13.0V
- 2 Green LEDs: Voltage 12.5V – 13.0V
- 1 Green LED: Voltage 12.0V – 12.5V
- 3 Red LEDs: Voltage 11.5V – 12.0V
- 2 Red LEDs: Voltage 11.0V – 11.5V
- 1 Red LED: Voltage < 11.0V
Note: This reading measures voltage at the controller leads with the engine off; actual battery terminal voltage may vary depending on motorcycle wiring and accessories.
5. Operating Considerations & Maintenance
- Operating Limits: Never exceed the specifications outlined in Section 6 to prevent permanent damage.
- Polarity: Verify correct polarity (12VDC positive, GND negative) before connecting.
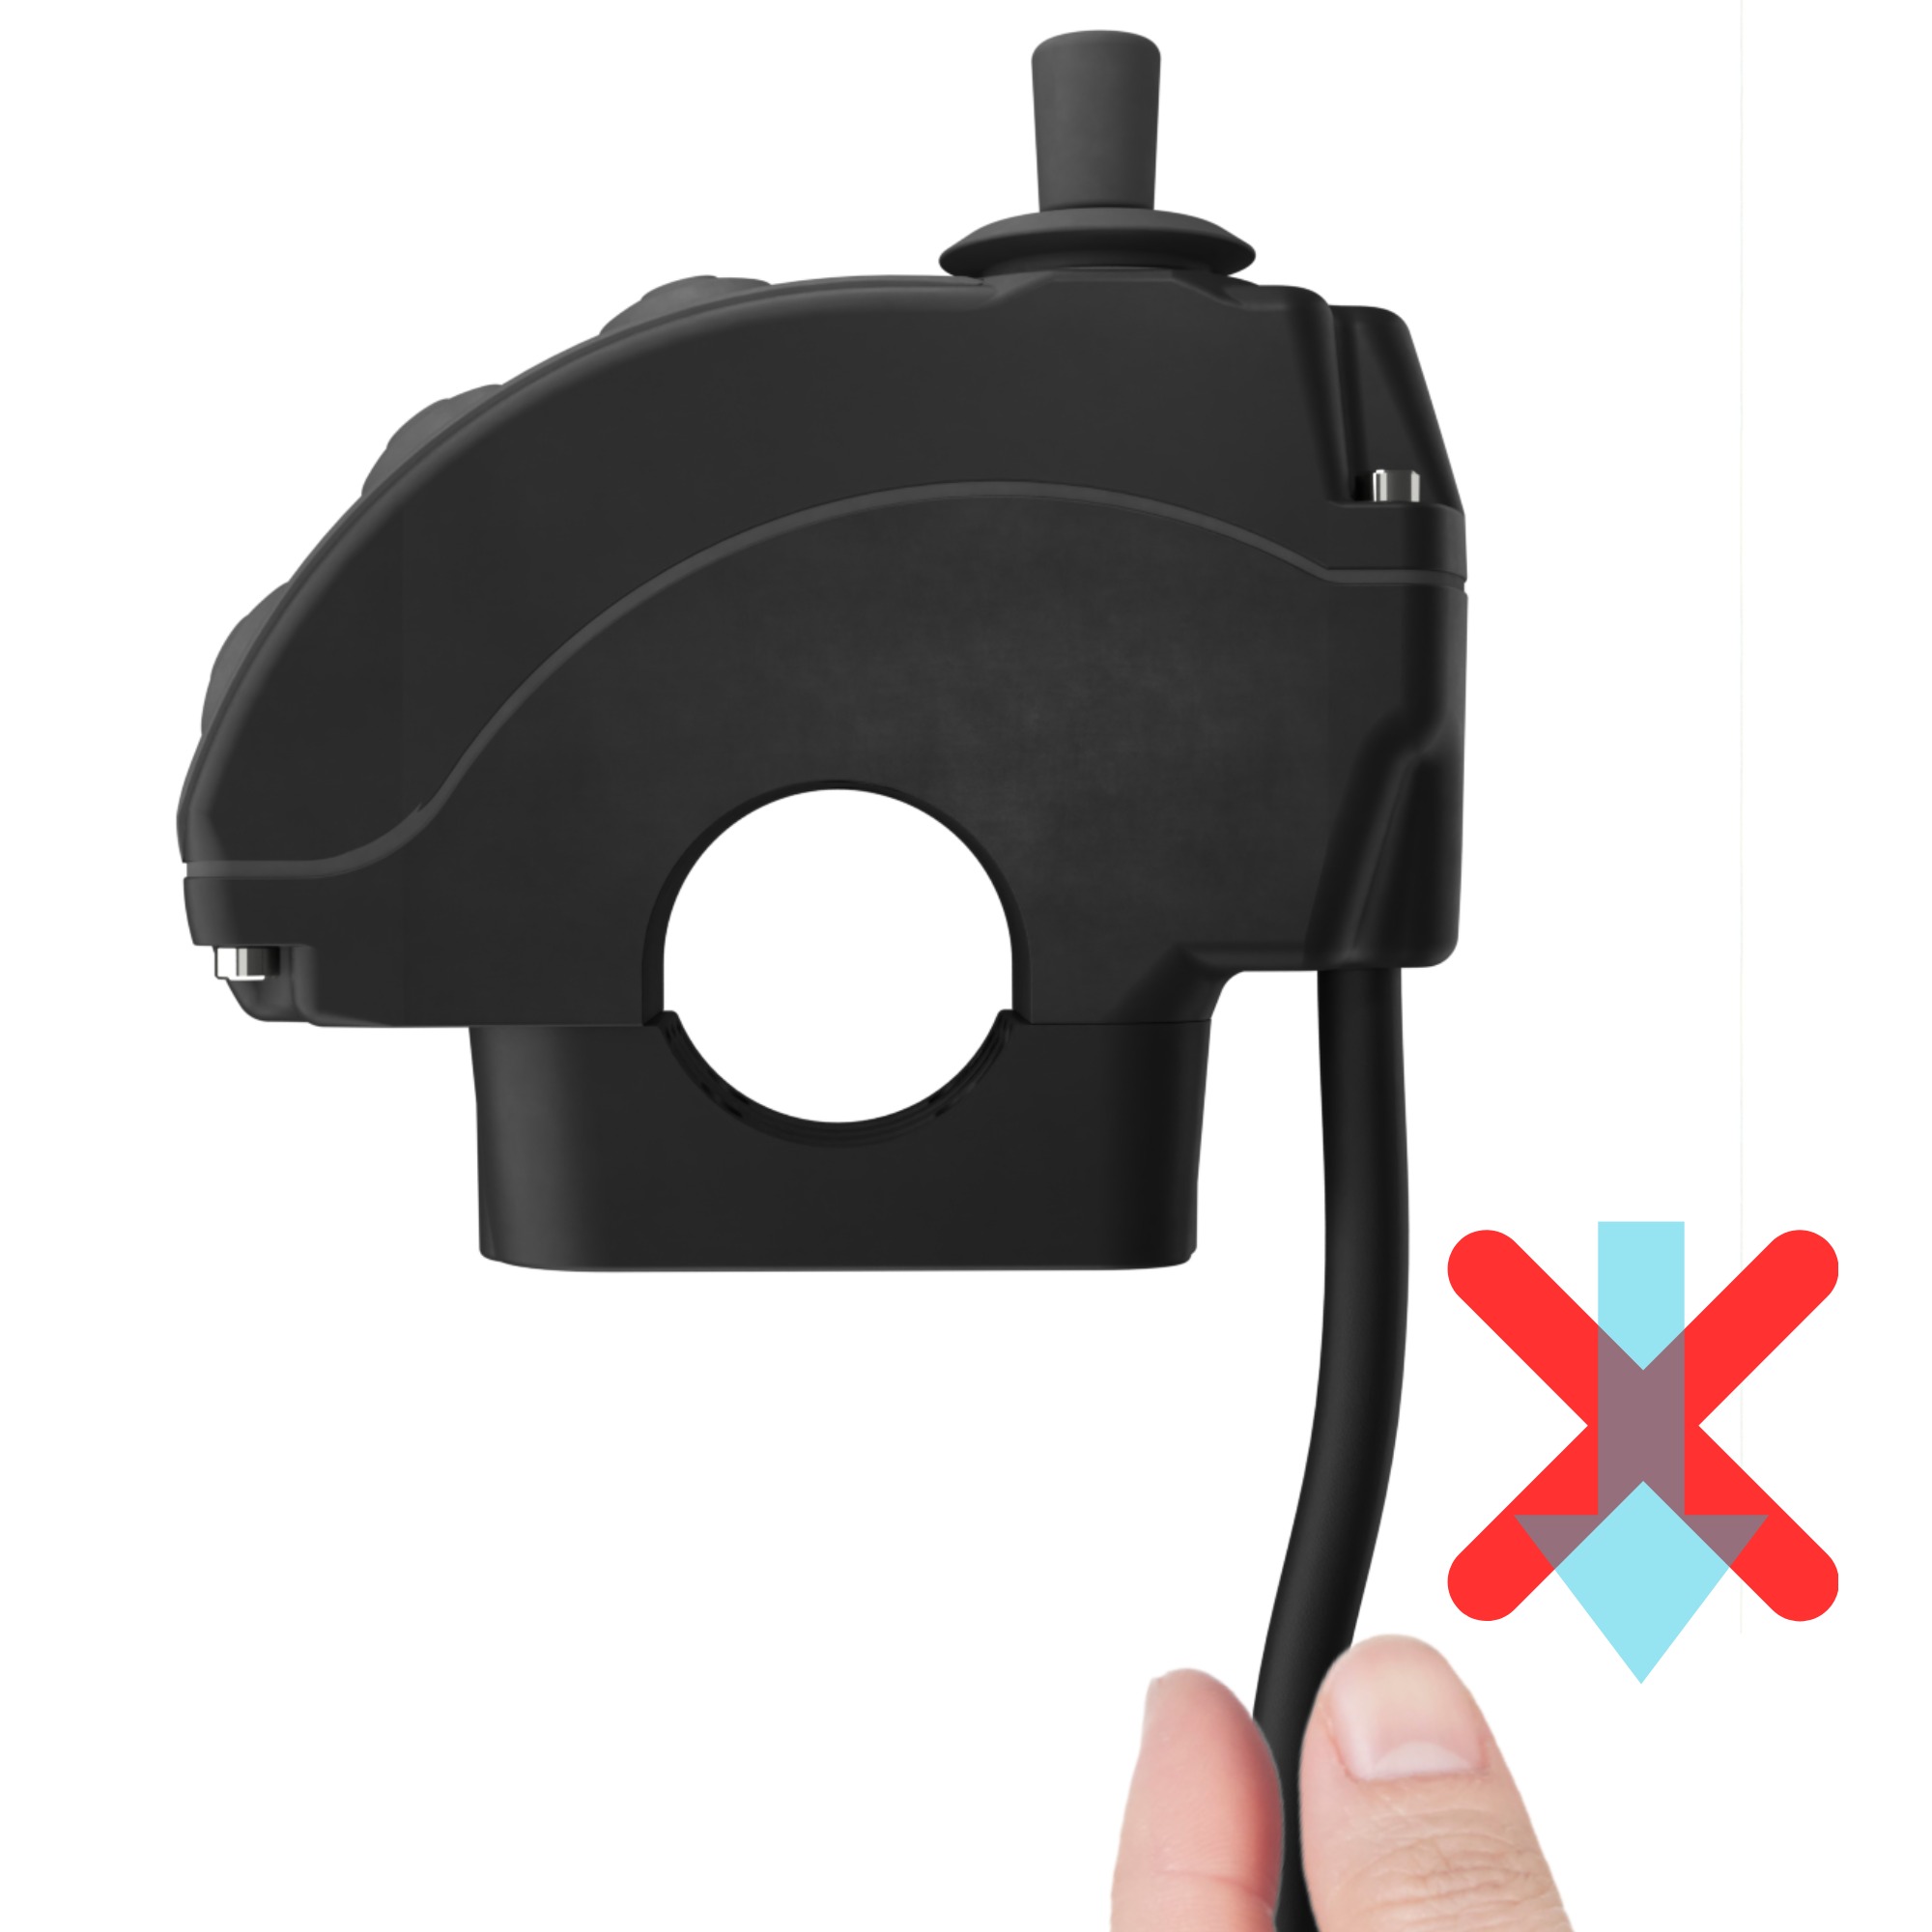
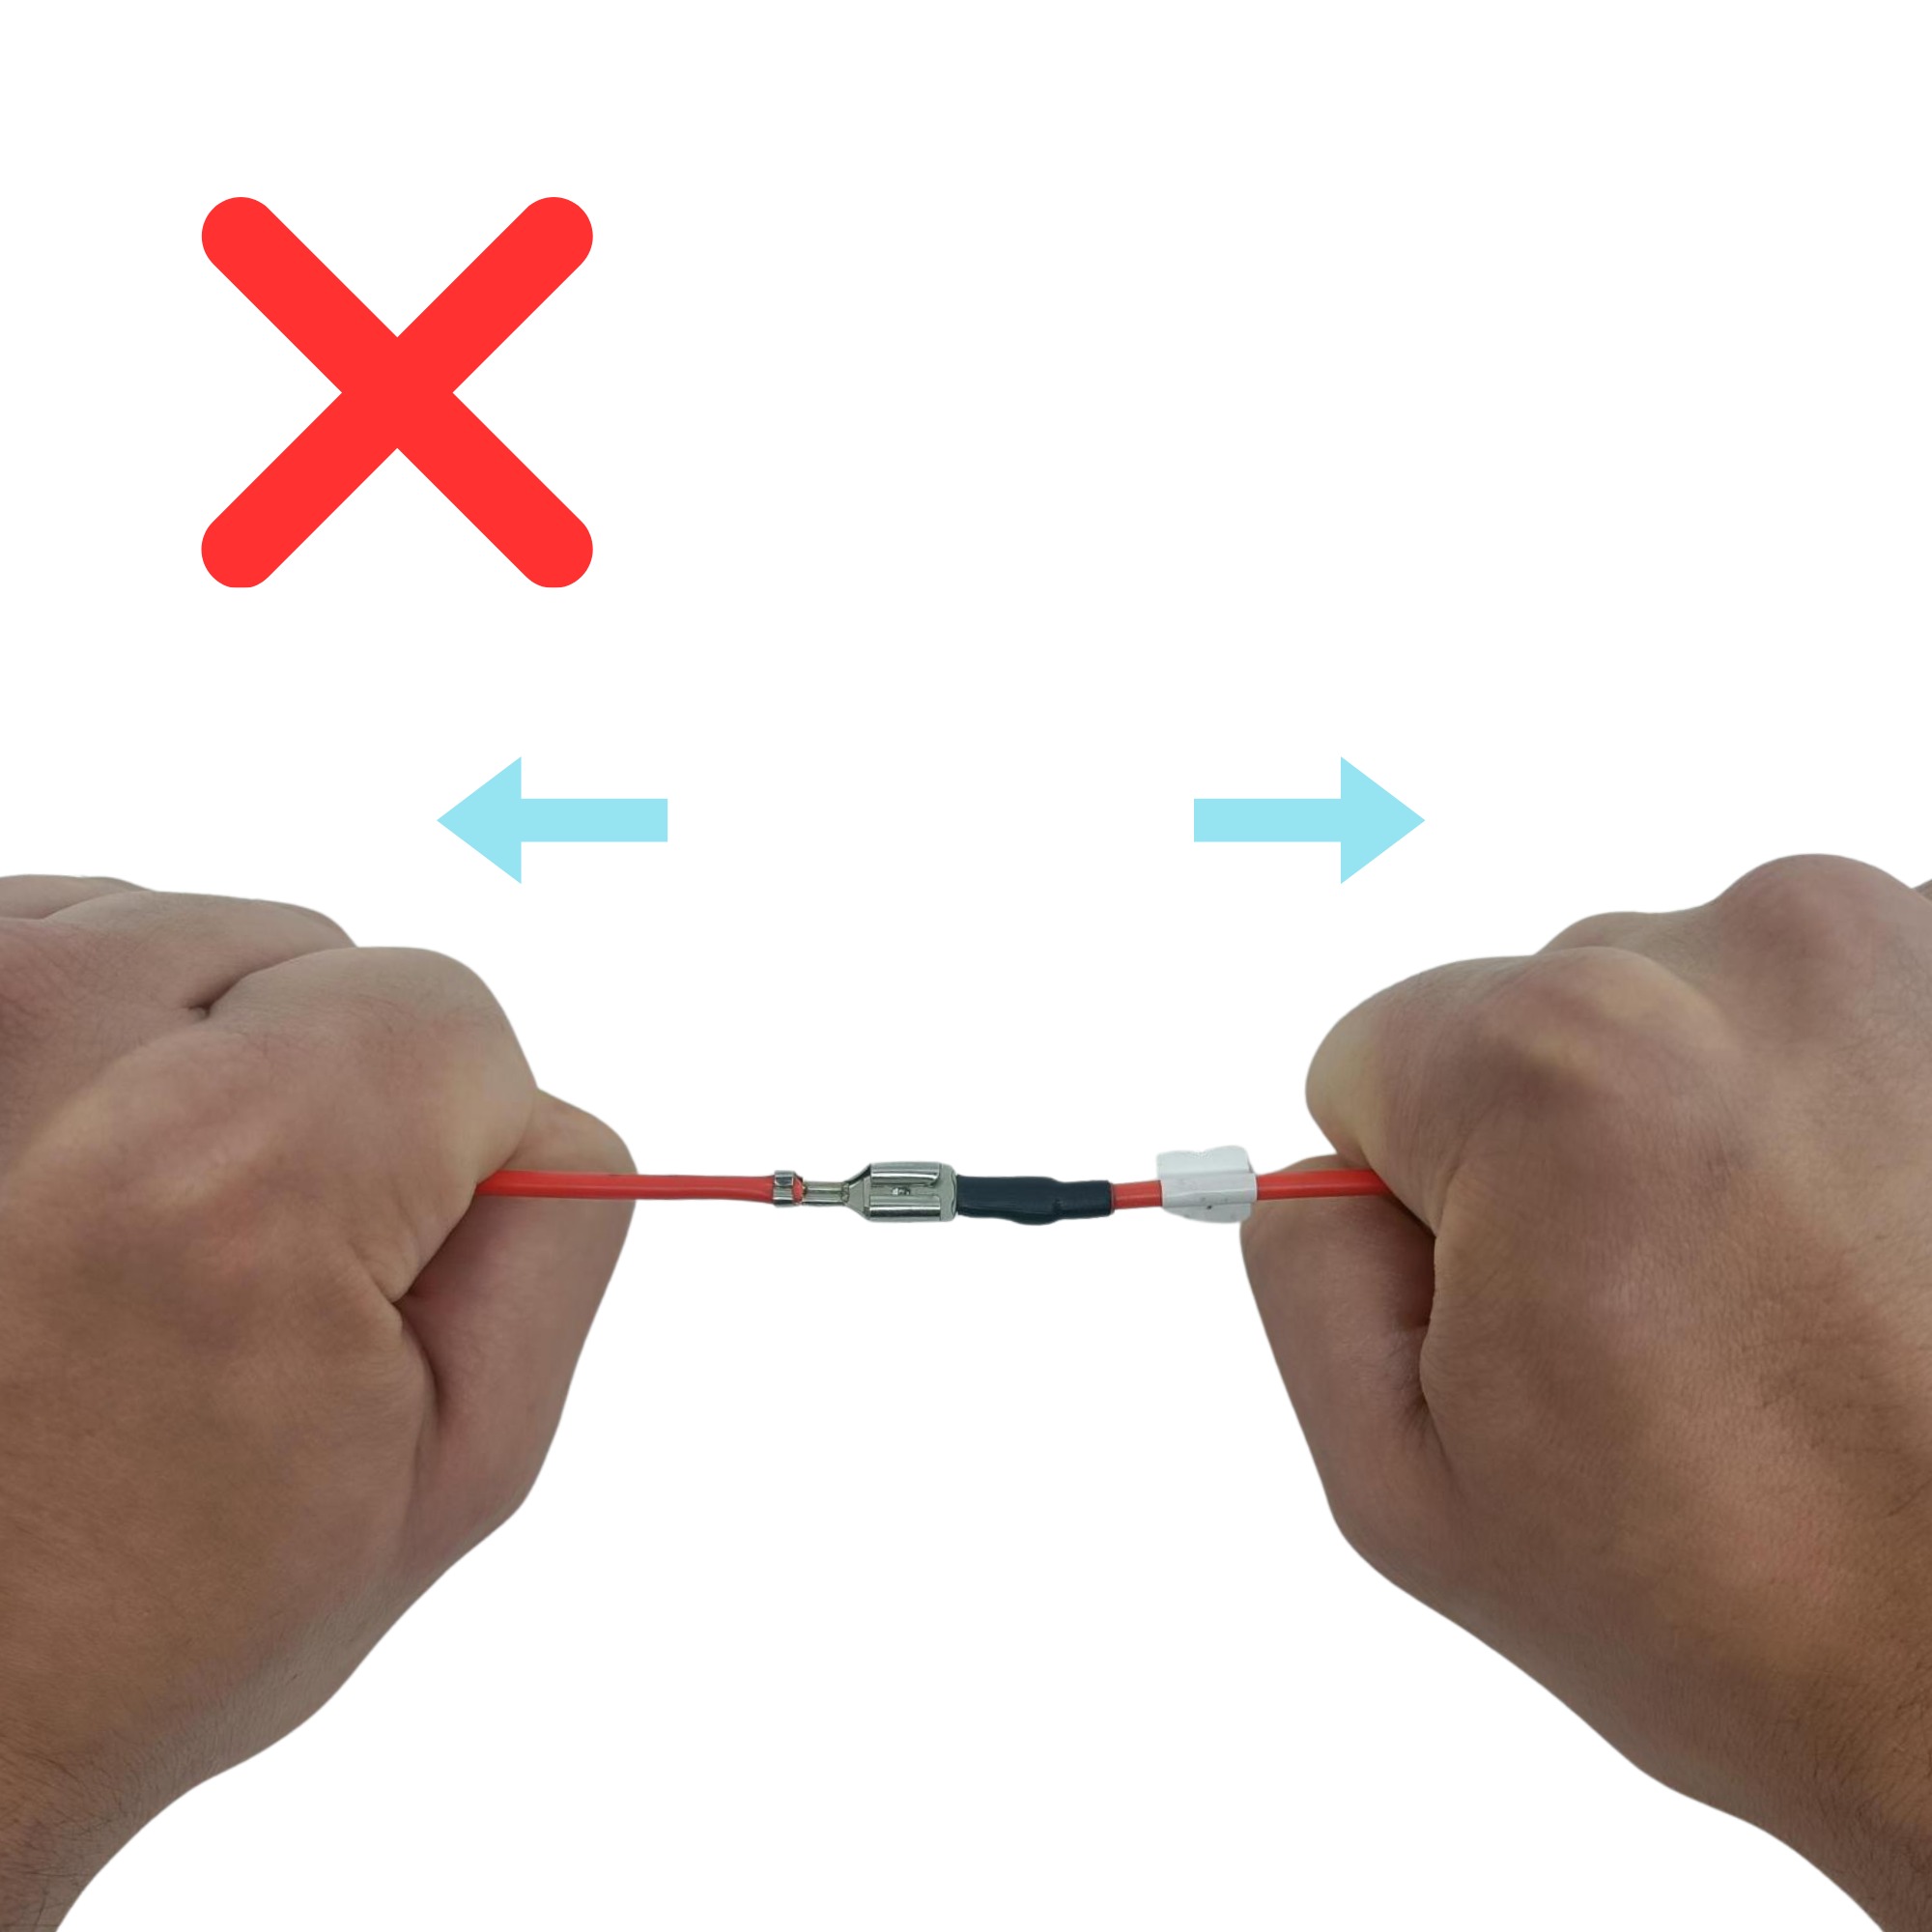
- Cable Care (Pulling): Do not pull on the cable assembly:
- Cable Care (Bending/Straining): Avoid sharp bends or pinching the cable assembly:
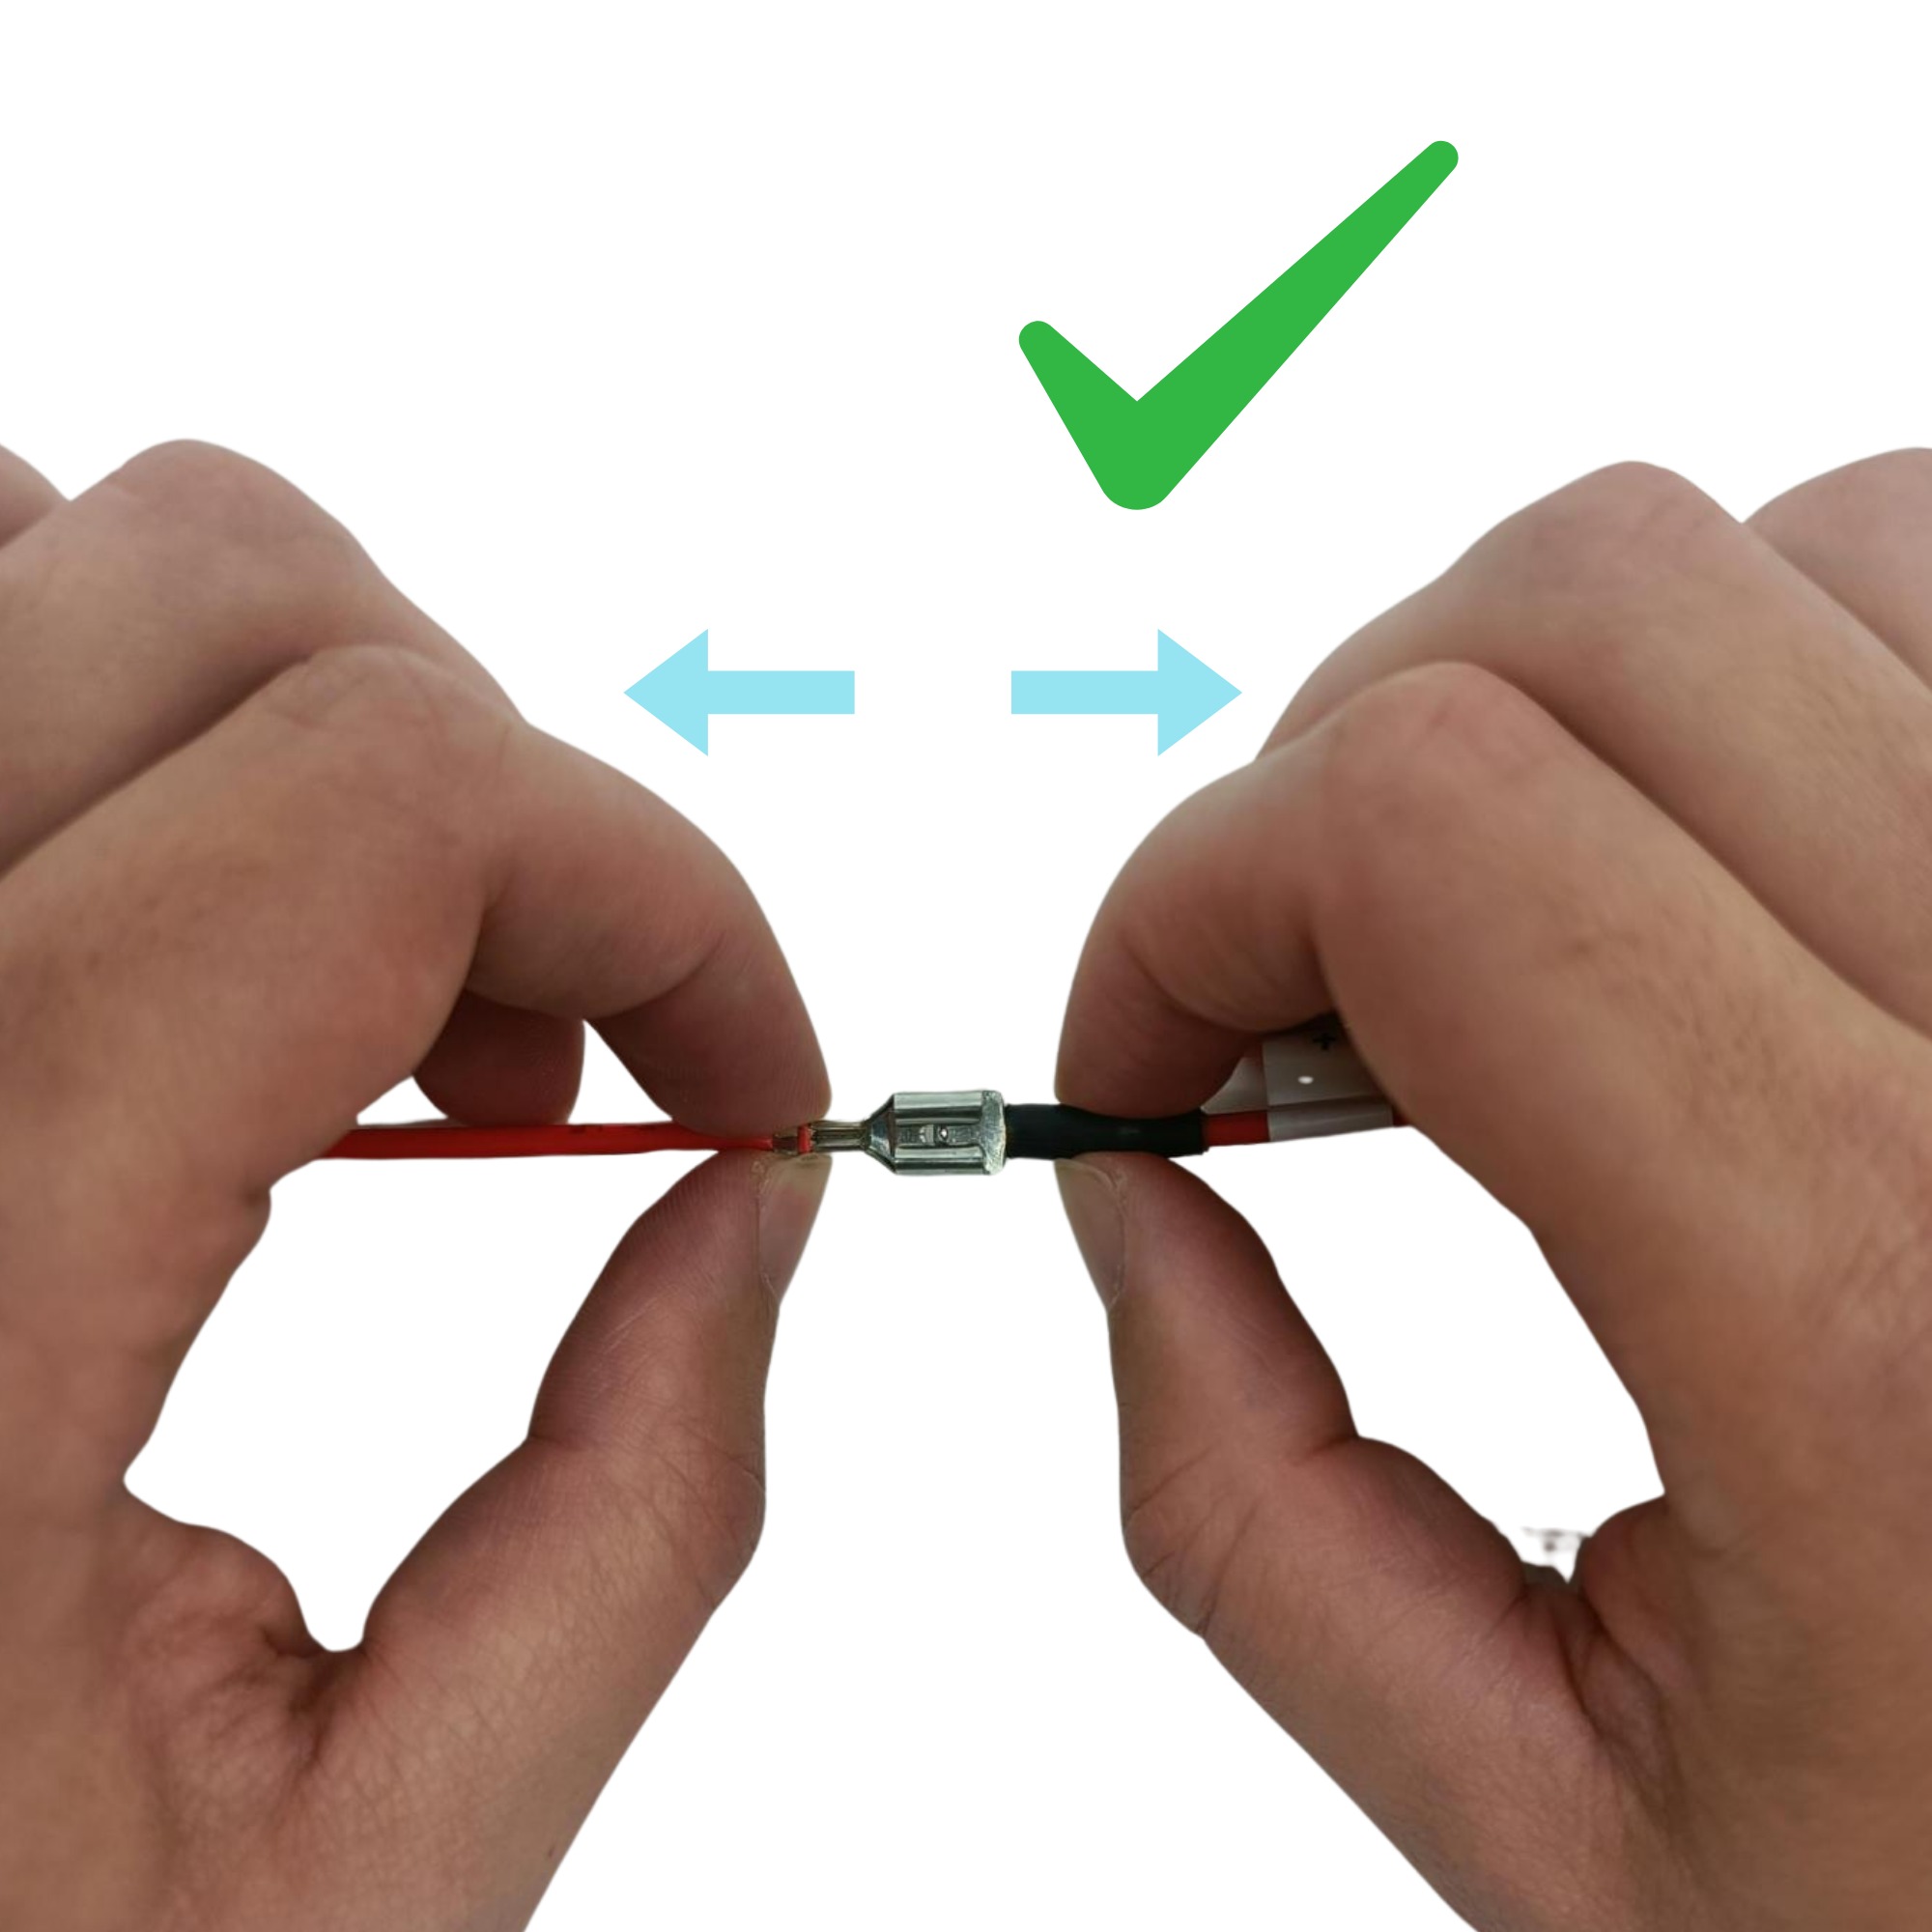
- Connector Disconnection: When disconnecting power tabs or the sensor connector, always pull directly on the plastic connector housings—never on the wires:
- Enclosure Screws: Screws are factory-secured with thread-locking compound and do not require routine re-tightening. If maintenance is performed, apply a mild thread-locking agent and tighten to a maximum torque of 0.08 Nm (8 N·cm). Do not overtighten. Loose screws compromise water resistance.
- Housing Integrity: Inspect the housing after crashes. If cracked, discontinue use in wet conditions and contact Carpe Iter support for housing replacement.
- Storage Temperature: Exceeding the +80°C maximum storage temperature will damage internal electronics and cause de-magnetization of the NdFeB joystick magnets.
- High Temperature Operation: In case of thermal overload, Adv Ctrl will resume normal operation once cooled within standard operating range.
- Direct Sunlight: When parking in high-temperature environments, shade or cover the controller. In extreme ambient heat, set backlight brightness to ≤ 50% to reduce thermal load from the internal LED driver.
- Water Jet Exposure: DO NOT direct high-pressure washers (WAP / pressure sprayers) at Adv Ctrl. Avoid mounting in locations subject to high-pressure water blasting during high-speed wet weather riding.
6. Specifications
- Operating Voltage: 10 – 15V DC
- Power Consumption (Active): ~40mA @ 12V (Bluetooth connected, wheel sensor active, LEDs at 100% brightness)
- Power Consumption (Standby/Idle): ~2mA (active idle) / ~10µA (deep sleep)
- Ingress Protection: Weather- and dust-resistant (all-weather motorcycle grade)
- Operating Temperature: -15°C to +60°C
- Storage Temperature: -15°C to +80°C
- Control Elements: 1x Hall-effect joystick, 3x mechanical pushbuttons
- Operating Force: Nominal 0.5 kg (Max permissible: 2.0 kg)
- User Feedback: 3x RGB LEDs
- Max SENSOR Frequency: 40 Hz (>300 km/h on a 21" front wheel)
- Power Connectors: 6.3mm Faston spade terminals
- Sensor Connector: JST 02R-JWPF-VSLE style
- Dimensions (W x L x H): 22 x 77 x 30 mm (height above handlebar excluding joystick)
7. Disclaimer
- Homologation: Unless explicitly stated, Carpe Iter items are not road-homologated and are used at your own risk.
- Sharp Edges: Ensure mounting brackets and accessories do not face the rider with sharp edges. Dismount unused empty holders/brackets.
- Inherent Risk: Motorcycle riding involves inherent risk. Proper mounting does not eliminate the possibility of personal injury or equipment damage in the event of an accident.
- Documentation: Manuals and documentation are provided exclusively in electronic format.
- Installation Competency: Installation assumes basic mechanical skill. In case of uncertainty, have installation performed by a qualified motorcycle workshop.
- Language: Technical documentation and support are provided in English.
8. Warranty
- Coverage Period: 2-year warranty for consumers; 1-year warranty for business purchases (B2B). Date of dispatch represents the purchase date. Software and batteries are covered under separate terms.
- Battery Warranty: 6-month limited warranty on internal/external batteries (guaranteed to retain ≥60% nominal capacity).
- Scope of Defects: Covers functional manufacturing defects. Cosmetic wear, paint fading, and superficial surface oxidation are excluded.
- Exclusions: Excludes damage resulting from misuse, lack of maintenance, unauthorized disassembly, or normal wear and tear.
- Software: Provided as-is without warranty.
- External Forces: Excludes damage caused by crashes, severe impact, vibration exceeding normal use, pressure washing, or thermal abuse.
- Expendable Parts: Rubber seals, O-rings, and plastic exterior components are expendable parts.
- Claim Procedure: Defective items must be shipped to Carpe Iter for inspection with a detailed defect report. Shipping and customs/import duties are the responsibility of the claimant.
- Remedy: Carpe Iter reserves the right to repair, replace, or provide financial compensation for verified warranty claims.
- Replacement: Carpe Iter may elect to replace a defective item in lieu of repair.
- Resolution Timeframe: Warranty claims are evaluated and responded to within 30 days of receipt.
- Pre-authorization: Contact Carpe Iter customer support via email before shipping items to streamline processing and avoid unnecessary shipping expenses.
Was this article helpful?
That’s Great!
Thank you for your feedback
Sorry! We couldn't be helpful
Thank you for your feedback
Feedback sent
We appreciate your effort and will try to fix the article